

 This is the final render of the 3D scene I had to work with. It's a good start, but it has that sterile, perfect look that is so easy to do in 3D. However, it's great for taking care of composition, shadows, and perspective and is a good foundation to start with in Photoshop. The first thing to do is add perspective lines to assist in transforming textures. This is best done by creating vector Shape layers with the Line tool. Use Full Screen Mode With Menu Bar. This option used to be at the bottom of the Tools panel, but in CS4 it's in the new Application Bar. With this viewing mode, the image window extends out to the edge of the screen and you can zoom out to see a blank area outside of the borders of the image. A similar space in Illustrator is called the canvas, but as far as I know, there is no corresponding term in Photoshop. Here, the canvas is the visible artwork and anything placed beyond it is not seen. Selections and raster-based tools don't work in this area, but vector-based tools do. Set the Line tool to 1 pixel and make a line from a straight edge in the image out to what is presumably the horizon. You can see that the line extends into this blank are beyond the Photoshop canvas, whereas a raster line would not. Incidentally, you can change this background color by right+clicking on it and then choosing a better color than the default midtone grey. That's what I have done.
Hold down the shift key and you will see a little plus by your cursor. Now you can add a new line to this Shape layer instead of creating a new layer (which is what would happen by default). That is the goal: to put all these lines on one layer. I often use a Shape layer for each axis: X, Y, and Z. If I get too many lines going, then I'll add new layers. Unlike Illustrator, all the vector shapes on a single Shape layer must be the same color. This is because the layer really only holds one color and the vector shapes are acting as masks to show that color.
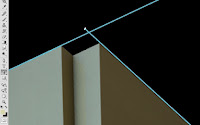 Where two lines converge that are in reality parallel is a vanishing point. Remember perspective class? For most 3D rendered scenes, you will probably have three vanishing points (for width, height, and depth), but depending on how much objects are turned, you could have more. I used to use raster lines, but with vectors, you can grab the ends and move them around; this is amazingly useful, especially if you didn't get it quite right the first time. In order to reposition a line, you must use the Direct Selection tool. That's the white arrow. One odd thing to keep in mind is that since Photoshop doesn't like open paths, these are not stroked rules like you might find in Illustrator. Each line in Photoshop is actually a long, skinny rectangle acting like a mask. Vector shapes here don't have strokes and fills. So to move just one end, you have to make sure you select both points on the end with the Direct Selection tool. Dragging a marquee to select them both is the easiest way. What's great about this technique is that you can zoom out to select what you need, then zoom back in to view a different part of the image and use the arrow keys to move the line end(s). Hold down Shift to move in increments of 10 pixels instead of 1.
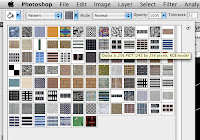 With the vanishing points and perspective lines set up, it's time to start texturing. For this, you'll need to make or load some patterns. Texture map libraries for 3D models are a great resource. For this application, we need seamless building patterns: photos of brick, stone, windows, etc. Put together a library of patterns that are most applicable to the kind of work you do. Keep adding to it when you come across new ones you like. Other useful textures are cracks, concrete, wood planks, dirt, grass, and decorative architectural elements. You can also save your patterns as an external file and take them with you.
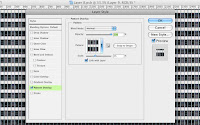
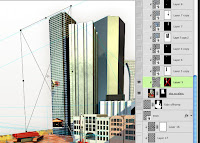 Load an alpha channel from your render and use it as a mask on the render layer. Create a new layer and fill it with any color. Then add a Pattern Overlay with Layer Styles. Choose a window texture that you like. Don't worry about its scale; we can deal with that later. Convert it to a Smart Object by right-clicking on it in the Layers panel and choosing from the drop-down menu. ALT/OPT+click between the two layers to use the render layer as a clipping mask. Now, transform the Smart Object layer with Distort and Skew. This is only possible in CS4. In previous versions, transformations like Warp, Distort, and Perspective would not work on Smart Objects, so this technique did not exist. But now, Smart Objects are finally 'smart' and can be fully transformed. Vector Smart Objects are still limited, though. Oh well, maybe in CS5.
You may be wondering why I didn't use the Vanishing Point filter. Well, if you look carefully, you'll see that it's not really a filter, since it's in a category all by itself. Vanishing Point doesn't recognize Smart Objects or vector shapes, so it is limited. Also, I have found the quality of the images it produces lacking at times. Transforming Smart Objects is non-destructive, so it really is the way to go. Try different Blend modes to see what you like. You want the highlight and shadow of the 3D object to show through; that's the whole idea. For this one, I chose Overlay at 80%. Hard Light, Soft Light, and Multiply may also work.
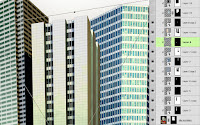
 This first building has a middle piece that sticks out from the front face, so the windows need to look like they're wrapping around it. First, use the Polygonal Lasso tool to make a selection around this part, then add a mask to the layer. Duplicate the layer and invert the mask. You will also need to mask out the dark sides of the building. Be sure to unlink the mask from the layer so that you are only transforming the Smart Object and not the mask as well. The great thing about Smart Objects in CS4 is that when you go back to transform them, all the settings are still there; nothing has been reset. The skewed sides are still in place, so to match the window pattern to the receded front, grab the top and Scale it down a bit. The grab the bottom edge and scale it as well so that you end up with the same height as when you started. Make sure you don't just move it; that will mess up the perspective. If you scale the edges instead, you will keep them perfectly aligned with the perspective of the scene.
 If the building texture isn't quite right, you can double-click on its layer and edit the Smart Object, which opens up as a PSB, for some strange reason. That's also Photoshop's large document format for files over 2 Gb in size, so why it should be the file format here as well is a mystery to me. It's apparently not a linked file that resides externally; it just magically pops up when you want to edit it. With the Smart Object open, you can edit the Pattern Overlay to change its Scale or even choose a new texture altogether. When you're done, save the Smart Object and your main file automatically updates. Pretty neat! You can keep making adjustments in this way until the pattern is perfect.
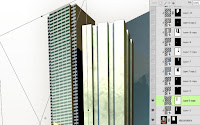
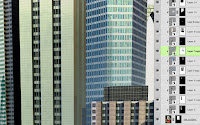
 This building has windows only in the recessed areas. Since all the shapes are composes of straight lines, it's easy to make a selection for the mask. With the non-destructive editability of Smart Objects, you can keep fine-tuning all the sides until they match up. These windows worked best in Multiply mode. For the blue building behind it, Hard Light gave the impression of shiny glass and steel. Adjust the Opacity of each layer as needed so that the original balance of highlight and shadow on the render shows through.
 The smaller building in front was done the same way. A brick pattern was used as that's more likely in a building with fewer storeys. Pick textures that you like to give each building some unique character. Notice that all of these layers are clipped to the bottom render layer, so that nothing sticks out beyond the building shapes. What's cool is that with not very many patterns, you can create a wide diversity of buildings, just by varying the scale and Blend mode of the Pattern Overlays, along with the color behind them. And the best part of it all is that with Smart Objects, you can come back and easily make more changes. In a few clicks these could be completely different buildings. This is something I've been waiting for in Photoshop for a long time, so I'm glad Adobe finally implemented it.


You may be wondering why I didn't use the Vanishing Point filter. Well, if you look carefully, you'll see that it's not really a filter, since it's in a category all by itself. Vanishing Point doesn't recognize Smart Objects or vector shapes, so it is limited. Also, I have found the quality of the images it produces lacking at times. Transforming Smart Objects is non-destructive, so it really is the way to go. Try different Blend modes to see what you like. You want the highlight and shadow of the 3D object to show through; that's the whole idea. For this one, I chose Overlay at 80%. Hard Light, Soft Light, and Multiply may also work.


No comments:
Post a Comment