23 October 2011

I'm giving a presentation this month

It's been in the works for a while, but now I know I'm giving the presentation at the North Bay Adobe Users Group meeting this month. The topic I have chosen is Vectors and Effects: from Photoshop to Illustrator and Back Again. I know it's a long title, but I wanted to be accurate. And I can pretty much guarantee you won't see anyone else teaching these kinds of techniques.

The NBAUG (as it's called) meets once a month at the Santa Rosa Junior College campus. It starts at 7:00 in the evening and since it just happens to be Hallowe'en, costumes are encouraged. I'll be in one, so come and join in the fun. You just might learn something. Click here for more info.

11 October 2011

Greenscreen spill correction

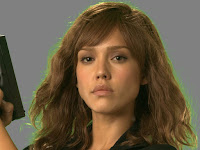
There are many ways to remove the green spill, so let's start simple and work our way up. A good technique is to see what an adjustment layer will do. Add a Hue/Saturation adjustment layer above the photo. Clip it down so the photo is acting as a clipping mask. You can do this by OPT (Mac)/ALT (PC) + clicking between the two layers, or just click the clipping button at the bottom of the Adjustments panel. We need to try and affect just the green areas, not the whole photo. To do this, try a little-used option on this panel. Click the Master drop-down and choose Greens instead. Now slide the Saturation slider all the way to -100. If the Master option had been left on, the photo would be greyscale, but since Greens are chosen, they are the only colors affected. The green hasn't been removed completely, but the spill's intensity has been reduced somewhat and any overall green cast to the photo has been lessened.

It's a bit better, but it's not there yet. The next step is to try and directly adjust the color of the green spill. Add a new layer above the adjustment layer and fill it with an average color sample from the photo that will counteract the green. In this case, I chose a reddish-brown taken from the hair. Change the layer's Blend mode to either Hue or Color and clip it down with the rest of the layers. I chose Hue for this example, but they are really quite similar. Currently, the Opacity is 100% and it is tinting the entire layer. The next step is to restrict this effect to just the edges and then adjust the Opacity as needed.

To do this, we need another mask. Load a selection from the alpha channel originally created by Calculations by CMD (Mac)/CTRL (PC) + clicking on its thumbnail. With the selection active, add a mask to the Hue or Color layer. Now, do a Levels adjustment, sliding the white slider almost all the way to the left. This will expand out the white portions of the mask so that this brown tint extends farther into the photo.

The next step is to expand out the mask so that more of the green spill is covered. There are a number of ways this could be done, but let's try some of the newer tools in Photoshop. With the mask active, click the Mask Edge... button on the Masks panel. Take the Shift Edge slider up to +100% and then increase the Feather amount until the green disappears. Make sure Output To: is set to Layer Mask and click OK. Now the masking is pretty much complete.

You still may need to fine-tune the edge, but it might be a good idea to pop in a new background first. That way, you'll more accurately see what adjustments need to be made. The foreground will also probably need some adjustments like Color Balance and Curves or Levels to match the background. Once you have added these adjustment layers and clipped them down to the masked photo layer, you can see what needs to be done to the mask edge, if anything. Some options to consider: lowering the Opacity of the Hue/Color layer, expanding the sliders in the green area on the Hue/Saturation adjustment layer, or doing another Levels adjustment on the original mask, as you see here. If any haloing or fringing still appears around the edges, moving the midtone slider to the right will darken up those greys and hide more of the image. Use restraint here, because you don't want to lose too much hair detail. You could also try Shift Edge in the Refine Mask options; it does about the same thing.

Now zoom out and admire your work Check to see if the shadows of the background match the shadows of the subject. You may need to mirror one or the other as I've done here. For really good photo compositing, the images need to match in terms of noise, grain, and blur. These can easily be added in with filters, especially if you convert the photos to Smart Objects.

That's it! This is the process for extracting greenscreens. You could even automate the process of combining channels and making the initial mask. Other tutorials out there use Extract (which isn't even automatically installed with Photoshop anymore) or modifying a selection with Refine Edge, but these tools really aren't designed for greenscreens. They are more appropriate for other backgrounds. This is really the way to do it and mastering these skills will open up many doors of Photoshop goodness.

10 October 2011

Fixing the mask

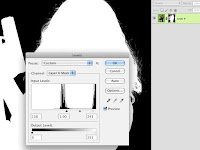
With a few quick steps, we can fix the mask. The information is there; we just need to pull it out. Layer masks are simply greyscale images that can be adjusted like any color photo with Levels or Curves. To see the mask directly while you are working on it, OPT (Mac)/ALT (PC) + click on its thumbnail. Since these kinds of adjustments are pretty simple, use a Levels adjustment. The histogram shows where the dark and light values are. The mask needs to be mostly pure black and pure white with some greys for anti-aliasing. You can either drag the sliders inward manually or use the eyedroppers. Choose the white eyedropper and click in the mask in areas that aren't quite white but should be. Choose the black eyedropper and click in the dark areas that aren't quite black but should be. The trick here is to get enough black and white, but not lose the detail around the hair which comes from the greys and fine detail in the mask. It's a trick because in keeping this detail, a lot of green from the background still comes through.  Add a solid color layer behind the masked image to get a better idea of your edge quality. If you don't know what the new background will be, use 50% grey as I have done here. As you can see, soft edges like hair pose the greatest challenge. This is compounded by what is called 'spill,' where light bounces off the greenscreen and illuminates the edges of the subject. For good greenscreen extraction, we need to remove spill as well. That will be covered in the next tutorial.

08 October 2011

Green screen removal

This tutorial is a departure from illustration, but it's a topic we have been covering in some of my classes lately. Background removal is an important skill in Photoshop, something every digital artist should know how to do. I have seen a lot of tutorials on the web, both written and video, about how to do this, but honestly, most of them get it wrong. It's true that there are many ways to remove a background in Photoshop and some of them can work well, but greenscreen removal is a special process. There is a reason it's used a lot these days for digital compositing. Decades ago, a special color of blue that had unique photographic properties was used. This is because it was all done optically with cameras. Now, this kind of work is done digitally and green has become more commonly used because of how this color interacts with the RGB channels. You can it here in a scene from Star Wars: Attack of the Clones:
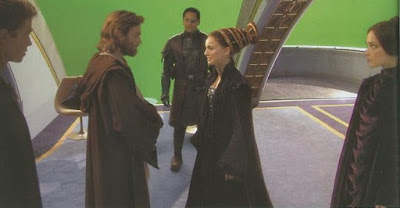
copyright Lucasfilm Ltd.
For this example, I'll use this picture of Jessica Alba that I 'found.' I just hope that none of the creators of Machete get too upset, but if Ms. Alba would like to discuss the details with me personally, I'm sure we could come to an agreement. The start to getting a good green screen extraction is a good image: well lit, consistent green color, large pixel size, and high image quality. Although this one is a JPG, it should work well enough.  The first step is to make a mask, of course. We aren't going to use anything like Color Range or Refine Edge; we'll go straight to the channels.
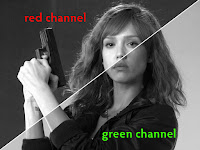
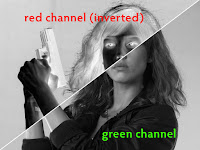
The reason that so many effects shots are done with greenscreen these days has to do with how this color affects the Red and Green channels specifically. Obviously, digital compositing is done with footage using AfterEffects, Nuke, or other specialized software, but the concept is the same as what we see in Photoshop. We'll need to use an RGB image with the color profile set to sRGB. Since this is a greenscreen, let's start with the Green channel first. It has good separation of the darker areas from the background, but that's about it. The Red channel has good separation of highlights and skintones, but the darker areas fade into the background. The best way to make a mask from a photographic source is to do it procedurally (letting Photoshop do all the hard work) in the channels, but I've seen many tutorials give up here and go for some other tool because no single channel has all the necessary information. However, the best masks come from a multi-step process and the usefulness of greenscreen is how the Red and Green channels combine. Taking another look at the Red channel of any greenscreen image, you will see that if it were inverted, it would have just the right dark information that the Green channel is missing. If we could then just get its dark parts (Multiply) into the Green channel, that would work. What we want here is an easy way to combine what we need from each channel into a new channel and Photoshop has just that: Calculations.
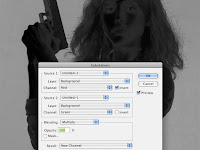
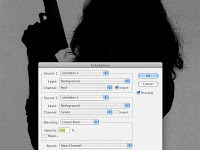
Go to Image >Calculations... You will see the options for combining two channels. Choose Red  and Green. It doesn't matter which one is Source 1 or 2. Be sure to check Invert on the Red channel, since we need the opposite of its information. By default, the Blending will probably be Multiply. Already, this looks pretty good. The background is noticeably lighter than the foreground and the highlights have been replaced with darker values. But there is still some definition inside the figure and it could be better. Change the Blend mode to Color Burn; it's much stronger, like Multiply on steroids. The background appears to lighten up just a bit, but the foreground gets almost black. It's almost a mask with practically no effort! However, if your foreground has any pure white in the highlights, it might not get turned to black. That's because Color Burn won't appear over white, just like Color Dodge won't appear over black. I see some blocky white specks in my black areas. If that's the case, try Linear Burn. It's very much like Color Burn, but it will cover white. The background darkens up a bit, but now the white specks are gone. Make sure the Result is New Channel and click OK.
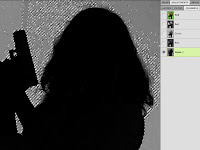
You now have a new Alpha channel. At this point, you will really be able to see how good your greenscreen photo is. The brighter and more consistently lit it was, the smoother and brighter your background will be, with more contrast between darks and lights. In my case, it's good but not great, and I see some artifacts from the JPG compression that weren't so evident in the full color photo. Here is where higher quality will certainly pay off. Load the channel as a selection, go to your layers, and make a mask. As you know, if this layer is a Background layer, you'll have to convert it to a regular pixel layer first.
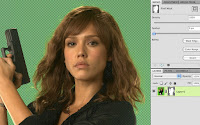
If you have followed all the steps exactly, you should end up with something like this. The problem is that it's just the opposite of what we need. Actually, it's not a problem. It's easy to invert a mask, or selection, either before or after you make it; there's no loss of information. With the mask active, you could press CMD (Mac)/CTRL (PC) + I for Invert, or you could just press the Invert button on the Masks panel. Now you see the foreground and the greenscreen is masked out. Well, almost. In my example, there is still a fair amount of green back there because that part of the mask is not completely black. There may also be a little transparency in the foreground as well. Be that can all easily be corrected as we fine-tune the mask. Tune in next time for that.