

For the glowing ring underneath the ten coils, make a circle on a new Shape layer with the Ellipse tool. I am using a bright blue with a Hue of 188. If you want a different color, adjust the hue of this shape and all of the associated Layer Styles. Hold down ALT/OPT to make an additional circle that cuts out the middle. Do this again for the little wires along the top of this wide ring. Refer to earlier posts of this tutorial if you need to remind yourself of the various ways to do this. In order to see the coils underneath this ring, load a selection from that Shape layer and may a new mask on this layer. Invert the mask so that it looks like the example shown here. You may wonder why this ring is above the coils, and we'll see why in a moment.

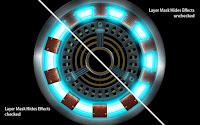 Add an Outer Glow of the same blue color. Adjust the Size and Opacity to your liking, but keep the Blend mode at Screen. For the Inner Glow, use the settings shown. The key element here is to change the Source to Center. You can keep it at the default light yellow; it may warm the interior a bit, but with Screen, it will be pretty much white anyway. Now you see why we have this shape on top of everything else. Luminous glows will always appear to be above solid items around or even above them. Make sure you don't check the Layer Mask Hides Effects option on Advance Blending. If you do, you can see what happens: the glows around the masked areas disappear completely. Here you can see the difference between having this option checked and unchecked. This is a great example of why this option is here. It is very powerful and can do a lot for you if you understand it.
 The one possible negative effect of this technique is that because of how the mask affects the Inner Glows, it now looks like we have ten individual lights instead of one lighted ring. If this isn't what you want, duplicate this layer, turn off its Outer Glow, and check the Layer Mask Hides Effects option. You can see the bright central glow going all the way around the ring. Now one layer is giving you the Outer Glow you need, and another is giving the Inner Glow. Lower the Opacity if you would like to reduce this and delineate the ring sections somewhat; it's all a matter of personal taste. I won't judge.

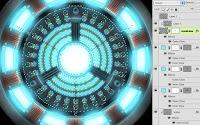 For the central light, make a circle on a new Shape layer, using the same color and effects as on the ring. I added Photoshop's Herringbone pattern on this layer's mask to suggest a wire mesh or grill over the light, but it will probably get blown out after the final layers are added. To increase the amount of light wrap around the solid elements and extend the glow behind everything, make a new layer and add a foreground-to-transparent Radial gradient with your bright blue color. Give it the same Outer Glow as on the previous layers and add a layer mask based on a selection loaded from the solid interior elements. Make sure that Layer Mask Hides Effects is not checked and set the layer's Blend mode to Screen. Use this layer as a Clipping Mask for a new layer above it and fill that with a Radial gradient of white to transparent. Now the center looks really luminous, with light spilling out in all directions and fading away from the center. The reflected glows we put on parts like the coils and brackets are finally starting to make sense.
 It looks good and we could call it done at this point, but there is just a bit more to do that would really take the image to the next level. It might not be completely accurate, but to really show the effects of luminosity, we could lighten the black background. Go all the way down to the bottom layer and make a new one right above it. Use a dark grey of your choice and make a Radial foreground-to-transparent gradient from the center of the arc. I suggest using the next to the darkest slot from one of the PMS grey ramps. The one you choose depends on what color cast you want to give the background. Then go to the outer ring Shape layer and give it a Drop Shadow as shown. If the Distance is set to 0, the shadow extends out evenly from the shape, similar to an Outer Glow. This suggests that the ring is raised up a bit from the background and casts a small shadow from the reactor's lights.
That's it! Now you have a realistic and accurate depiction of Tony Stark's arc reactor to decorate any item or device you wish. If only it could power it as well...

 Add an Outer Glow of the same blue color. Adjust the Size and Opacity to your liking, but keep the Blend mode at Screen. For the Inner Glow, use the settings shown. The key element here is to change the Source to Center. You can keep it at the default light yellow; it may warm the interior a bit, but with Screen, it will be pretty much white anyway. Now you see why we have this shape on top of everything else. Luminous glows will always appear to be above solid items around or even above them. Make sure you don't check the Layer Mask Hides Effects option on Advance Blending. If you do, you can see what happens: the glows around the masked areas disappear completely. Here you can see the difference between having this option checked and unchecked. This is a great example of why this option is here. It is very powerful and can do a lot for you if you understand it.

 For the central light, make a circle on a new Shape layer, using the same color and effects as on the ring. I added Photoshop's Herringbone pattern on this layer's mask to suggest a wire mesh or grill over the light, but it will probably get blown out after the final layers are added. To increase the amount of light wrap around the solid elements and extend the glow behind everything, make a new layer and add a foreground-to-transparent Radial gradient with your bright blue color. Give it the same Outer Glow as on the previous layers and add a layer mask based on a selection loaded from the solid interior elements. Make sure that Layer Mask Hides Effects is not checked and set the layer's Blend mode to Screen. Use this layer as a Clipping Mask for a new layer above it and fill that with a Radial gradient of white to transparent. Now the center looks really luminous, with light spilling out in all directions and fading away from the center. The reflected glows we put on parts like the coils and brackets are finally starting to make sense.
That's it! Now you have a realistic and accurate depiction of Tony Stark's arc reactor to decorate any item or device you wish. If only it could power it as well...


