
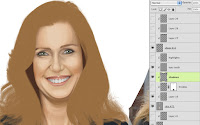
With the basic shapes laid in, it's time to start painting. This woman has red hair and a light, yet ruddy, complexion, so the coloration is a bit tricky. A good choice for the base skin tone is PMS 475. Start painting the details on a new layer that is clipped to the main skin layer. Use the same brush and settings as you used on the flat basic shapes. For the facial features, pick colors from the 475-469 ramp. For some variation, you can try some other browns as well. The 483-489 ramp has some nice warm reds that work well for lips and cheeks. Notice how I am following along with my source photo, but I decided to minimize her double chin. I doubt she really wants to see it and I suspect that it's more a product of how she is smiling than anything else. The darker colors are painted on a separate layer and the eyes and mouth are painted on a layer above that. So far, everything has been done in Normal mode with a light touch on the stylus to get lots of transparency to the painting when needed.

To finish things off, let's add some highlights. Since the background is yellow, pick a light value from the same PMS ramp. In this case, it's 123. That may seem a bit strange, but change this layer's Blend mode to Screen and you'll see how light the color gets. It works nicely as a highlight and it brings a subtle hint of the background color into the figure. That will help to tie everything together. This is an area where you can have some fun and punch up the highlights even more than what is in the photo.

One more thing: our subject has freckles. You can choose to include something like this or not, but since I was going for personality and a good likeness, I decided to keep them. We don't want to have to hand-paint every one, but Photoshop's brushes should provide a good shortcut. I used my favorite Pencil - Thin brush, but I made a duplicate of it with a lot of jitter in the Shape Dynamics categories, but the most important here is Scatter. Make the brush size quite small and paint lightly on a new layer with PMS 484. Change the layer's Blend mode to Multiply and lower the Opacity to 40%. You can also add a layer mask and put some black radial gradients on it to fade them out around the center of the face. Now they are concentrated on the edges and the neck. I think it's a nice look, and hey, I like freckles.

In case you're wondering if I had forgotten about the legs, well I haven't. The face and legs use the main base 475 layer, so all the leg details are painted on the same layers (except for the eyes and teeth layer, of course). Here is what the painting progress on the legs looks like. As I was working on them, I was a bit worried, but for some reason, the freckles layer seemed to make them look finished.
Last but not least, the hands: one of the trickier parts of human anatomy to draw. The other skin layers are underneath the clothes layers, but the hands' base is painted on a new layer above the jacket. Other than that, they are done in the same way as the rest of the skin, with detail, highlight, and freckles layers clipped to the main 475 base layer. The selection shows how I masked out where the hand are covered up by the jacket. Now that the skin is done, in the next tutorial, we will work on the hair.


 With the basic shapes laid in, it's time to start painting. This woman has red hair and a light, yet ruddy, complexion, so the coloration is a bit tricky. A good choice for the base skin tone is PMS 475. Start painting the details on a new layer that is clipped to the main skin layer. Use the same brush and settings as you used on the flat basic shapes. For the facial features, pick colors from the 475-469 ramp. For some variation, you can try some other browns as well. The 483-489 ramp has some nice warm reds that work well for lips and cheeks. Notice how I am following along with my source photo, but I decided to minimize her double chin. I doubt she really wants to see it and I suspect that it's more a product of how she is smiling than anything else. The darker colors are painted on a separate layer and the eyes and mouth are painted on a layer above that. So far, everything has been done in Normal mode with a light touch on the stylus to get lots of transparency to the painting when needed.


Nice tutorial. What were your brush setting for the skin. I have CS5 with a Wacom Intous4 tablet. Trying to find some good settings.
ReplyDeleteFor the skin, unless otherwise specified, I am using a fairly simple brush that comes from one of Photoshop's default sets. The Opacity jitter is set to Tablet, and that's about it.
ReplyDeletePhotoshop illustration is the process of creating artwork using Adobe Photoshop. It combines digital drawing, painting, and photo-editing techniques. Artists use brushes, layers, and effects to build detailed visuals. It is widely used for concept art, posters, and digital designs. Photoshop illustration allows high creative control and professional results.
ReplyDeleteSEO Company in Dallas
SEO Company in Noida