
The first part we will work on is the color map. This image will provide the overall color of the 3D object. Texture maps have many different properties in the 3D program; this one will be called color or maybe diffuse, depending on the program you use.
When creating the image in Photoshop, work in pixels, not inches. And don't worry about resolution; all the 3D program will see is pixels. Resolution only matters when you are going to print your image. Another thing to be sure of is that you are working in the sRGB color space, as opposed to Adobe RBG (1998), which is designed more for print. How large should you make your image? That all depends on what size it will be in your final rendered scene or animation. A good rule of thumb is to estimate the final size in pixels, then work at 150% or 200% of that size in Photoshop.

This image is at 200x1000 pixels. That's probably much larger than is necessary, but there is no problem working big and it will make our job in Photoshop easier than if it were a tiny image. To start out, use the Rectangle tool and make a vector Shape layer using PMS 416. Even though the final will get rasterized on the 3D geometry, working with vectors is a great way to work in Photoshop because they are so flexible and editable. You can also easily extend them beyond the canvas so that layer effects don't stop at the edge of the image. This shape will be the dull metal strips on the sides. To make things look used and grimy, add some effects like a dark Inner Glow in Multiply mode and maybe Bevel and Emboss. A Pattern Overlay will work here as well, in this case, Photoshop's default Clouds pattern is useful. Take the Scale up and set its Blend mode to Multiply, so we get a nice, dark, splotchy texture.
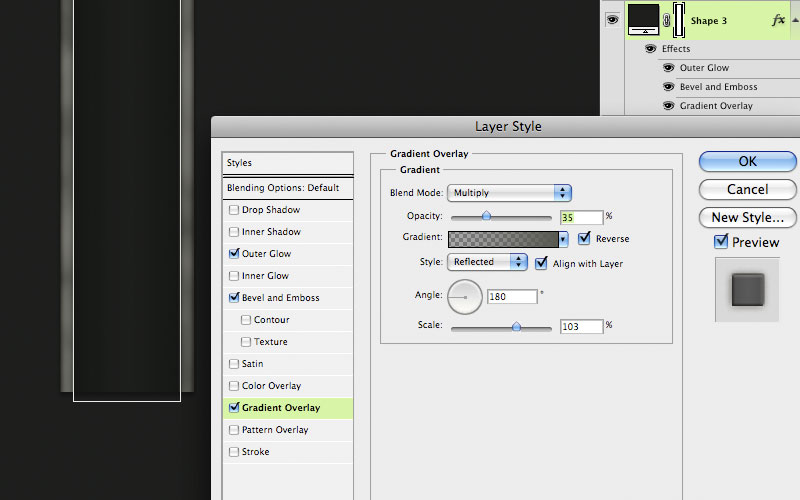
 Next, we will create the channel in the middle that the non-skid strip will fit into. Make another vector rectangle on a new Shape layer, this time with PMS 419. As before, extend the top and bottom past the canvas size of the image. This is because this texture needs to tile vertically. Add some dark Outer Glow and a Bevel and Emboss. Give it a Gradient Overlay with the settings shown here. The idea is to darken the edges a bit.
 For the yellow part, make a new vector rectangle using PMS 108. Extend it past the canvas on the top, but not the bottom. Select it with the Path Selection tool, then Copy and Paste. Move your second rectangle down so that there is a little gap between the two. Now you have two non-skid panels. They will need the same Outer Glow, Gradient Overlay, and Bevel and Emboss as the other layers. In fact, you could just Copy and Paste the Layer Styles to save time. But this one needs a stamped metal texture or something similar like this. If you don't have a pattern like this, it should be easy enough to find on the web. Scale it down to the right size and set the Blend mode to Overlay. That way, you get the lights and darks of the texture, but the midtone values drop away. Now we are starting to get somewhere.
 It looks good, but the problem is that it's a bit too clean. The trick with computer graphics is to make things look scuffed, used, and dirty. To get the look of dirt stuck in the recessed areas, make a new layer, set your foreground/background colors to the default black and white, then apply the Clouds filter. Change the Blend mode to Multiply and lower the Opacity if needed. Then, clip it to the non-skid panel's layer so that the vector rectangle becomes its Clipping Mask. Now the non-skid texture appears on top of the Clouds texture and it looks like there is dirt in the crevasses. It's done! Next time, we will make the bump map.


Adobe Photoshop Tutorial
ReplyDeleteStarting with Color Maps
Color Map Versus Matte Painting
Making the UV Test Map
Diffuse Maps
Projection Method
Bump Map
Desaturating: Tolerable on Occasion
Grayscale
Simple Range Adjustments
Advanced Range Adjustments