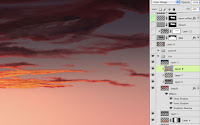
For this little painting, I decided to use standard HD size (1920x1080). As you should know, if you are dealing just in pixels, resolution doesn't matter. I chose this size for a good width to height ratio and it's good for a quick painting: not too big, not too small. If you have followed my previous tutorials, you know that I start skies with a solid color on the bottommost layer and make each gradient as foreground to transparent on a separate layer. This allows me to have the most control over them in terms of Opacity and Blend mode.
To help me along with my dramatic, sunset sky, I chose a picture from my source library and used it as a guide to paint the sky. I picked colors directly from it since I was working quickly. Having each gradient on its on layer was especially useful here, because I could add a layer mask as shown in the screenshot to suggest where the sun was going down. Notice that the layer is set to Color Dodge and the Fill has been lowered. This is a great way to simulate luminosity, especially with gradients. Usually, I add a darker gradient at the top in Multiply mode, as I've done here.
 Next come the clouds. They were roughed in quickly with a softer, natural brush. I added some layer effects to give them a bit more depth. You can see here what I've done with the Inner Shadow to be more of a lit edge. This layer became a clipping mask for layers above it. Highlights were painted on one layer, shadows on another. The highlights' layer was changed to Color Dodge mode. A foreground-to-transparent radial gradient was added above that to represent the glow of the setting sun, reflecting on the clouds. Its Blend mode was also Color Dodge and the Fill was lowered as shown. Finally, A dark gradient in Multiply mode was added to the top above all the clouds, but not clipped with the other cloud layers.
In the next tutorial, we'll cover the ground and mountains for the landscape and tie them together with the sky.


Awesome blog. I enjoyed reading your articles. This is truly a great read for me. I have bookmarked it and I am looking forward to reading new articles. Keep up the good work!
ReplyDeleteclipping path services
Oh my!!! You are just too true to be good. How do you manage to write and research on such wonderful things? You have inspired me to work harder now. I shall try as much as possible to enjoy life to the fullest and be satiated with the wonderful things that are around me, which I have been unaware of until now. clipping path
ReplyDelete