The smooth lines and structural design of the arc reactor suggest that the best way to start is with vector Shape layers. Most of the final image will rely on these combined Layer Styles, so the final artwork will basically be resolution-independent. That is always a plus. I decided to make mine 2" at 300 ppi, so all my effects sizes will be based on this. It can easily be sized up or down later.

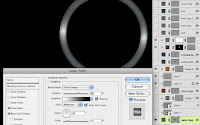
Start with a black background larger than your final shapes. Pull down guides to create your center point and then measure out from there. This will become extremely important in getting accurate positions. Use the Ellipse tool to make a Shape layer with PMS 425. Position your cursor at the center of your design where the guides intersect. After you start making the circle (but not before), hold down ALT/OPT to build the shape out from the center and not the corner. Before you finish dragging, hold down SHIFT to constrain the ellipse into a circle. To create the inner circle, select the path with the Path Selection tool, Copy and Paste, then Transform this second path down proportionally to the width you want. Accept the transformation, make sure the inner path is selected, and then click the Subtract from shape area (-) button in the Options bar. Now you have a perfect ring. Add a Layer Effect. You should probably be able to guess by now which ones they should be: a dark Inner Glow in Multiply mode, a Bevel and Emboss with the Highlight in Color Dodge, and a Gradient Overlay. Use the settings shown. We'll be using Color Dodge a lot, because it creates intense, specular highlights indicative of shiny metal.

This outer ring represents the container for the reactor and it should like like brushed steel. On a new layer, make some thin, triangular selections with the Polygonal Lasso tool, emanating from the center point of the design. Fill them with 425 and clip this layer to the main ring Shape layer. Convert this new layer to a Smart Object. Double-click the layer thumbnail to edit the Smart Object, then make it a Smart Object again. Now we have two Smart Objects, one nested inside the other. Hopefully, you'll see why in a moment. Click on the layer of the first Smart Object and add a Radial Blur. Adjust the center and Amount as needed. Because we are doing this on a Smart Object inside of another Smart Object, the amount of blur can be adjusted if you don't like it at first. I had to keep reducing the Amount until it looked good. That's the beauty of Smart Filters. Save and close the Smart Object, then go back to the layer in the main PSD and change its Blend mode to Multiply. Lower the Opacity if you want.

Hold down ALT/OPT and click the Create a new layer button. With this modifier key, you get some nice layer options. Set the Blend mode to Overlay and check the Fill with Overlay-neutral color option. For this mode and all others in its section, this neutral color is 50% grey. That means that it's transparent on this layer. You should also select Use Previous Layer to Create Clipping Mask. Convert the layer to a Smart Object and Add Noise... Use the settings shown. This noise will be the basis for the metal texture. Lots of textures start out this way. Then add a Radial Blur to blur the noise radially (obviously) around the ring. Because these are both Smart Filters, you can go back and make changes if they don't look right. Also, remember that the order of the filters is important to the final look. In this case, we want to add the noise, then blur it, not vice versa.

The view here is basically a 1-point perspective looking straight down the reactor, so we'll need to see a bit of the inside of the outer ring to help set up some depth. Make a new Shape layer with the Ellipse tool. Follow the previously mentioned steps to make it a circle, centered around the center point of the illustration. Use a dark grey. Clip this layer along with the others and change the Blend mode to Multiply. give it an Outer Glow of light grey in Color Dodge and a Stroke with the settings shown. This is to show a bit of highlight from the glowing elements that will be added in later.

For the inner rings, make a new Shape layer with the Ellipse tool. This layer should not be clipped along with the rest. These rings should look different, more like brass, so use PMS 450. Add a bit of Bevel and Emboss. They will need some glow on them eventually, so make a new vector circle on a new layer clipped to this one. Lower the Fill to 0% and give it an Outer Glow and a Drop Shadow as shown. The bright Drop Shadow is to counteract the Bevel and Emboss' Shadow.

There are three thin brackets underneath the inner rings. To make these, use the Line tool to make a dark grey Shape layer under the rings. Make a thick vertical line right down the middle guide. Since there are three, each one should be 120º apart. Select the line with the Path Selection tool, then Copy and Paste. Now Free Transform. The first thing to do is move the reference point to the center of your design instead of the center of the shape. With one this thin, it may be a bit difficult, so hold down ALT/OPT and it will be easier to move the reference point. Now, type 120 in the Set rotation field. accept the transformation. With this line still selected, Copy and Paste again, then choose Edit> Transform> Again. This new line has new been rotated another 120º, using the same reference point. This is a handy way to rotate, scale, or move shapes in specific increments. Illustrator has a simple key command to to this. In Photoshop, it takes a few more steps, but it's still pretty easy. A nice keyboard shortcut to Transform Again is CTRL(PC)/CMD(Mac) + SHIFT + T. Add a bit of Bevel and Emboss if you want and these little bits are done.


 Start with a black background larger than your final shapes. Pull down guides to create your center point and then measure out from there. This will become extremely important in getting accurate positions. Use the Ellipse tool to make a Shape layer with PMS 425. Position your cursor at the center of your design where the guides intersect. After you start making the circle (but not before), hold down ALT/OPT to build the shape out from the center and not the corner. Before you finish dragging, hold down SHIFT to constrain the ellipse into a circle. To create the inner circle, select the path with the Path Selection tool, Copy and Paste, then Transform this second path down proportionally to the width you want. Accept the transformation, make sure the inner path is selected, and then click the Subtract from shape area (-) button in the Options bar. Now you have a perfect ring. Add a Layer Effect. You should probably be able to guess by now which ones they should be: a dark Inner Glow in Multiply mode, a Bevel and Emboss with the Highlight in Color Dodge, and a Gradient Overlay. Use the settings shown. We'll be using Color Dodge a lot, because it creates intense, specular highlights indicative of shiny metal.


No comments:
Post a Comment