

Even though the ship is basically black, you don't want to start with a color that absolute. It's best to avoid pure black (0, 0, 0) or pure white (255, 255, 255). Using a very dark grey is a better way to go, so you can go darker if you need. I chose PMS 440. Paint the spaceship on a new layer and use just this color to paint what amounts to a flat silhouette. An easy way to paint perfectly horizontal or vertical lines with a brush tool is to hold down Shift as you paint your line. This may seem obvious, but I painted in Photoshop for years before I figured this out. To paint a straight line at an angle, click once with the brush, then hold down Shift and click again. This one I knew. I find that it's better to use a mouse for this technique, because it's hard to get fully opaque on one click when using the stylus set to pressure, which is how you want to do most of your painting.
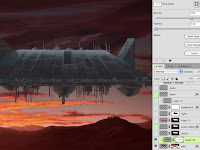 For the surface detail, paint on a new layer and clip it to the main spaceship layer. Notice how I have used cool greys for the top and warmer, rusty colors for the bottom. This helps with the image's color scheme. I'm trying to suggest that the warm sunlight is reflecting on the bottom of the ship. Speaking of the bottom, notice how the gradual highlights on the edges of the round parts make them look hemispherical and not flat. Painting on a new layer is great because you can adjust your details if they are too much. In this case, I wanted to tone them down toward the bottom edge, so I added a mask to this layer with a linear gradient. But now, it lost too much detail in the black part of the mask. That's why the Masks panel is so great. Notice how I've pulled the Density down a bit to bring the detail back in somewhat. This panel was introduced in CS4 and is something I've been wanting for a long time.
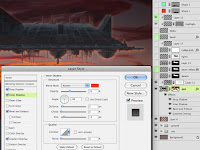
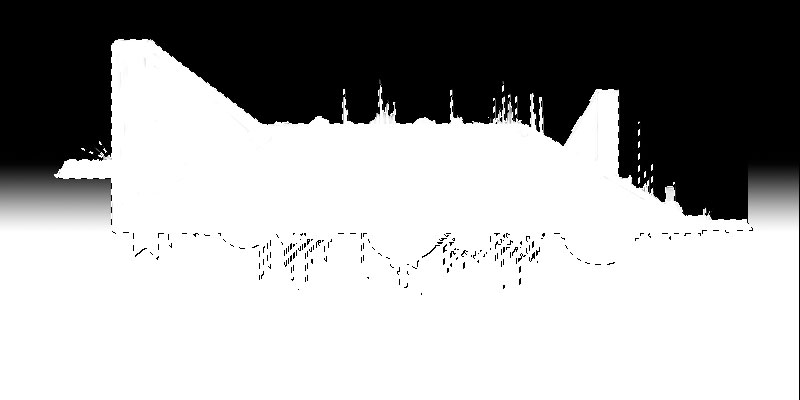
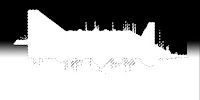 Instead of painting in some highlights from the sun, let's try it with layer effects. Bevel and Emboss works, but an Inner Shadow using these setting adds a nice look to the underside. A Gradient Overly in Multiply mode darkens the texture painting of the upper layer. To get a bit of an unearthly glow from the bottom, I added an orange Drop Shadow in Screen mode. The problem is that with the settings to get the right look, the shadow extends past the bottom and over to the sides and top. Currently, there is no way to mask off effects directly, but in this case, a layer mask will do the trick. CMD+click the main spaceship layer to load the pixels as a selection and add a layer mask. At first, you won't see any difference. Double+click the layer to open up Layer Styles. Under Advanced Blending, check the Layer Mask Hides Effects box. Now the outer effects disappear. Add a white-to-transparent linear gradient to the mask from the bottom upward. Now the Drop Shadow is visible at the bottom and fades away at the sides. This image shows the relationship of the original selection to the final mask.
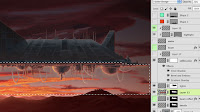 The rest of the spaceship details are painted in on separate layers not clipped to the main spaceship layer. To further illuminate the bottom areas of the ship, use a rusty color on a new layer in Color Dodge mode. Lower the Opacity until it looks right. The finishing touches are the cables that hang down. They might not look very practical, but this is a common sci-fi element. They have their own Bevel and Emboss and other effects, similar to the main spaceship layer.
The ship looks done now. For the last tutorial, we'll work on the energy beam fired from the ship. Not only will it tell an exciting story, but it will add some visual interest.


 Instead of painting in some highlights from the sun, let's try it with layer effects. Bevel and Emboss works, but an Inner Shadow using these setting adds a nice look to the underside. A Gradient Overly in Multiply mode darkens the texture painting of the upper layer. To get a bit of an unearthly glow from the bottom, I added an orange Drop Shadow in Screen mode. The problem is that with the settings to get the right look, the shadow extends past the bottom and over to the sides and top. Currently, there is no way to mask off effects directly, but in this case, a layer mask will do the trick. CMD+click the main spaceship layer to load the pixels as a selection and add a layer mask. At first, you won't see any difference. Double+click the layer to open up Layer Styles. Under Advanced Blending, check the Layer Mask Hides Effects box. Now the outer effects disappear. Add a white-to-transparent linear gradient to the mask from the bottom upward. Now the Drop Shadow is visible at the bottom and fades away at the sides. This image shows the relationship of the original selection to the final mask.
The ship looks done now. For the last tutorial, we'll work on the energy beam fired from the ship. Not only will it tell an exciting story, but it will add some visual interest.


It was certainly interesting for me to read that article. Thanks for it. I like such topics and anything that is connected to this matter. I definitely want to read more on that blog soon.clipping path
ReplyDeleteAfter a long time I got something fresh and quality content on massage therapy services. I searched a lot for the related material but got almost replica work. Keep it up! It is really very informative.clipping path
ReplyDelete