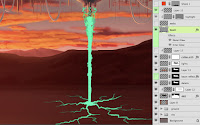
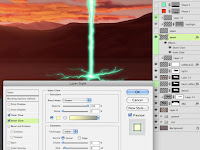
To make the image a bit more exciting and tell more of a story, we need something to happen. It's all set to fire some kind of beam down into the ground. Because the background is so warm with a red/orange color palette, let's use a cool color for contrast. I chose a green color, leaning a bit toward blue. Take the color straight from the Color Picker with a B value of 100%. For a color that is so bright like a laser beam, this is better than choosing a PMS color, because they don't tend to have the brightness or saturation necessary. Paint it with a simple brush and have the size set to pen pressure. This beam needs to be opaque all the way through, but taper off at the ends, so this is a rare instance where using the pen pressure to control opacity won't work. The color should be flat and solid, because the glows will be taken care of with Layer Styles. Use the settings shown here. The major part to remember is that the Inner Glow is set to Center; that gives you the nice, white-hot center of the beam.
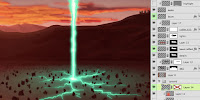
The glowing beam looks good, but to really get the effect of luminosity, the ground right below it should be lit as well. Use a radial gradient in the same green as the beam down with the previously-completed ground layers. Change the Blend mode to Screen and scale the gradient down a bit vertically to follow the perspective of the ground. To create a more interesting ground and give the light something to do, you could paint some features like rocks. These are done in a solid dark color with the help of a scatter brush, then touched up a bit with a normal brush. Use this rocks layer as a clipping mask for layers above it, upon which to paint the highlights. Layer Styles won't work here because the rocks encircle the light source. Paint an orange highlight from the setting sun on the tops of the rocks. Having the highlights on separate layers allows you to adjust their Opacity and Blend modes if necessary.
To really make this work, the rocks need to cast shadows against the ground. The first thing to do here is to figure out where they should be cast. A trick from perspective drawing class will help out here. Use the Line tool. Make sure it's set to create a vector shape layer. After you make the first line, hold down Shift for each additional one to add them to the same shape layer instead of making new ones. Start where the beam hits the ground and draw lines out to the rocks. Now, make a mask on the green gradient layer. With the lines as guides, paint black on the mask to simulate the shadows cast by the rocks. They don't have to be exact, just close enough to be convincing. Now this is starting to look really cool, but there's one more thing to do.
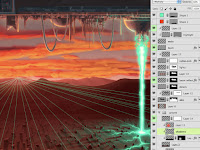
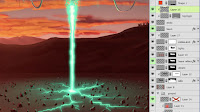
Start at the point where the sun hits the mountains; that's the light source. As before, use the Line tool to draw lines on a vector shape layer, radiating out to the edges of the image. I used a different color to differentiate these from previous lines. Go back to the ground layers and make a new layer in Multiply mode. Paint shadows on this new layer, using the lines as guides. Remember that objects cast long shadows at sunset. Lower the Opacity of the layer as needed. That should do it! There is now a really cool interplay of shadows from the two different light sources. Some rocks are now casting double shadows and the green light spills into some of them. The whole thing looks complex and fairly accurate, but you can see that by using Blend modes, several layers, and masks it's not that hard to do.


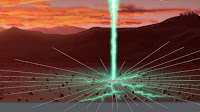
 To make the image a bit more exciting and tell more of a story, we need something to happen. It's all set to fire some kind of beam down into the ground. Because the background is so warm with a red/orange color palette, let's use a cool color for contrast. I chose a green color, leaning a bit toward blue. Take the color straight from the Color Picker with a B value of 100%. For a color that is so bright like a laser beam, this is better than choosing a PMS color, because they don't tend to have the brightness or saturation necessary. Paint it with a simple brush and have the size set to pen pressure. This beam needs to be opaque all the way through, but taper off at the ends, so this is a rare instance where using the pen pressure to control opacity won't work. The color should be flat and solid, because the glows will be taken care of with Layer Styles. Use the settings shown here. The major part to remember is that the Inner Glow is set to Center; that gives you the nice, white-hot center of the beam.
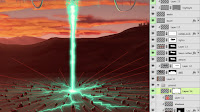
 The glowing beam looks good, but to really get the effect of luminosity, the ground right below it should be lit as well. Use a radial gradient in the same green as the beam down with the previously-completed ground layers. Change the Blend mode to Screen and scale the gradient down a bit vertically to follow the perspective of the ground. To create a more interesting ground and give the light something to do, you could paint some features like rocks. These are done in a solid dark color with the help of a scatter brush, then touched up a bit with a normal brush. Use this rocks layer as a clipping mask for layers above it, upon which to paint the highlights. Layer Styles won't work here because the rocks encircle the light source. Paint an orange highlight from the setting sun on the tops of the rocks. Having the highlights on separate layers allows you to adjust their Opacity and Blend modes if necessary.
 To really make this work, the rocks need to cast shadows against the ground. The first thing to do here is to figure out where they should be cast. A trick from perspective drawing class will help out here. Use the Line tool. Make sure it's set to create a vector shape layer. After you make the first line, hold down Shift for each additional one to add them to the same shape layer instead of making new ones. Start where the beam hits the ground and draw lines out to the rocks. Now, make a mask on the green gradient layer. With the lines as guides, paint black on the mask to simulate the shadows cast by the rocks. They don't have to be exact, just close enough to be convincing. Now this is starting to look really cool, but there's one more thing to do.


No comments:
Post a Comment