This tutorial is a departure from illustration, but it's a topic we have been covering in some of my classes lately. Background removal is an important skill in Photoshop, something every digital artist should know how to do. I have seen a lot of tutorials on the web, both written and video, about how to do this, but honestly, most of them get it wrong. It's true that there are many ways to remove a background in Photoshop and some of them can work well, but greenscreen removal is a special process. There is a reason it's used a lot these days for digital compositing. Decades ago, a special color of blue that had unique photographic properties was used. This is because it was all done optically with cameras. Now, this kind of work is done digitally and green has become more commonly used because of how this color interacts with the RGB channels. You can it here in a scene from Star Wars: Attack of the Clones:
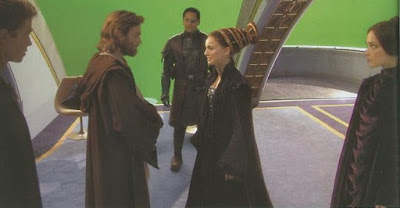 |
| copyright Lucasfilm Ltd. |
For this example, I'll use this picture of Jessica Alba that I 'found.' I just hope that none of the creators of
Machete get too upset, but if Ms. Alba would like to discuss the details with me personally, I'm sure we could come to an agreement. The start to getting a good green screen extraction is a good image: well lit, consistent green color, large pixel size, and high image quality. Although this one is a JPG, it should work well enough. The first step is to make a mask, of course. We aren't going to use anything like Color Range or Refine Edge; we'll go straight to the channels.
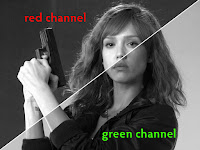
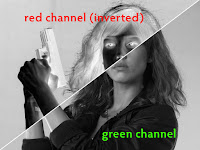
The reason that so many effects shots are done with greenscreen these days has to do with how this color affects the Red and Green channels specifically. Obviously, digital compositing is done with footage using AfterEffects, Nuke, or other specialized software, but the concept is the same as what we see in Photoshop. We'll need to use an RGB image with the color profile set to sRGB. Since this is a greenscreen, let's start with the Green channel first. It has good separation of the darker areas from the background, but that's about it. The Red channel has good separation of highlights and skintones, but the darker areas fade into the background. The best way to make a mask from a photographic source is to do it procedurally (letting Photoshop do all the hard work) in the channels, but I've seen many tutorials give up here and go for some other tool because no single channel has all the necessary information. However, the best masks come from a multi-step process and the usefulness of greenscreen is how the Red and Green channels combine. Taking another look at the Red channel of any greenscreen image, you will see that if it were inverted, it would have just the right dark information that the Green channel is missing. If we could then just get its dark parts (Multiply) into the Green channel, that would work. What we want here is an easy way to combine what we need from each channel into a new channel and Photoshop has just that: Calculations.
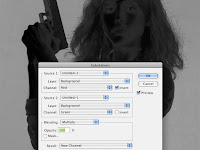
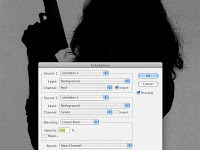
Go to Image >Calculations... You will see the options for combining two channels. Choose Red and Green. It doesn't matter which one is Source 1 or 2. Be sure to check Invert on the Red channel, since we need the opposite of its information. By default, the Blending will probably be Multiply. Already, this looks pretty good. The background is noticeably lighter than the foreground and the highlights have been replaced with darker values. But there is still some definition inside the figure and it could be better. Change the Blend mode to Color Burn; it's much stronger, like Multiply on steroids. The background appears to lighten up just a bit, but the foreground gets almost black. It's almost a mask with practically no effort! However, if your foreground has any pure white in the highlights, it might not get turned to black. That's because Color Burn won't appear over white, just like Color Dodge won't appear over black. I see some blocky white specks in my black areas. If that's the case, try Linear Burn. It's very much like Color Burn, but it will cover white. The background darkens up a bit, but now the white specks are gone. Make sure the Result is New Channel and click OK.
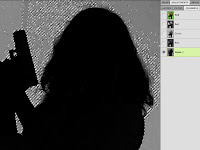
You now have a new Alpha channel. At this point, you will really be able to see how good your greenscreen photo is. The brighter and more consistently lit it was, the smoother and brighter your background will be, with more contrast between darks and lights. In my case, it's good but not great, and I see some artifacts from the JPG compression that weren't so evident in the full color photo. Here is where higher quality will certainly pay off. Load the channel as a selection, go to your layers, and make a mask. As you know, if this layer is a
Background layer, you'll have to convert it to a regular pixel layer first.

If you have followed all the steps exactly, you should end up with something like this. The problem is that it's just the opposite of what we need. Actually, it's not a problem. It's easy to invert a mask, or selection, either before or after you make it; there's no loss of information. With the mask active, you could press CMD (Mac)/CTRL (PC) + I for Invert, or you could just press the Invert button on the Masks panel. Now you see the foreground and the greenscreen is masked out. Well, almost. In my example, there is still a fair amount of green back there because that part of the mask is not completely black. There may also be a little transparency in the foreground as well. Be that can all easily be corrected as we fine-tune the mask. Tune in next time for that.


 The reason that so many effects shots are done with greenscreen these days has to do with how this color affects the Red and Green channels specifically. Obviously, digital compositing is done with footage using AfterEffects, Nuke, or other specialized software, but the concept is the same as what we see in Photoshop. We'll need to use an RGB image with the color profile set to sRGB. Since this is a greenscreen, let's start with the Green channel first. It has good separation of the darker areas from the background, but that's about it. The Red channel has good separation of highlights and skintones, but the darker areas fade into the background. The best way to make a mask from a photographic source is to do it procedurally (letting Photoshop do all the hard work) in the channels, but I've seen many tutorials give up here and go for some other tool because no single channel has all the necessary information. However, the best masks come from a multi-step process and the usefulness of greenscreen is how the Red and Green channels combine. Taking another look at the Red channel of any greenscreen image, you will see that if it were inverted, it would have just the right dark information that the Green channel is missing. If we could then just get its dark parts (Multiply) into the Green channel, that would work. What we want here is an easy way to combine what we need from each channel into a new channel and Photoshop has just that: Calculations.
 Go to Image >Calculations... You will see the options for combining two channels. Choose Red and Green. It doesn't matter which one is Source 1 or 2. Be sure to check Invert on the Red channel, since we need the opposite of its information. By default, the Blending will probably be Multiply. Already, this looks pretty good. The background is noticeably lighter than the foreground and the highlights have been replaced with darker values. But there is still some definition inside the figure and it could be better. Change the Blend mode to Color Burn; it's much stronger, like Multiply on steroids. The background appears to lighten up just a bit, but the foreground gets almost black. It's almost a mask with practically no effort! However, if your foreground has any pure white in the highlights, it might not get turned to black. That's because Color Burn won't appear over white, just like Color Dodge won't appear over black. I see some blocky white specks in my black areas. If that's the case, try Linear Burn. It's very much like Color Burn, but it will cover white. The background darkens up a bit, but now the white specks are gone. Make sure the Result is New Channel and click OK.

 If you have followed all the steps exactly, you should end up with something like this. The problem is that it's just the opposite of what we need. Actually, it's not a problem. It's easy to invert a mask, or selection, either before or after you make it; there's no loss of information. With the mask active, you could press CMD (Mac)/CTRL (PC) + I for Invert, or you could just press the Invert button on the Masks panel. Now you see the foreground and the greenscreen is masked out. Well, almost. In my example, there is still a fair amount of green back there because that part of the mask is not completely black. There may also be a little transparency in the foreground as well. Be that can all easily be corrected as we fine-tune the mask. Tune in next time for that.


Hi Dan,
ReplyDeleteGreat tutorial, very clear and the result looks very effective too. I'm a french digital artist and i use a lot of photography myself (which i take myself) and i used to work with neutral background, grey, white or black but remove the background was always a manual handful work. After seeing your amazing work, i guess i'll consider buying a chroma key green soon !
Check my work on facebook : www.facebook.com/aucoeurdemage or my website : www.aucoeurdemage.com
Thanks for everything !
Maxime. (France)
Very nice work on your site. I'm glad my tutorial helped you out. That's about the best result I could get.
ReplyDeleteI find this explanation about using RGB channels for green screen removal very insightful.
ReplyDelete