

Now, it's time to get started on the barn. Working with vector shapes is a good way to go. You could make this shape in Illustrator, but I like doing it all in Photoshop if possible. Start with the Rectangle tool set to the Shape layers option. Hold down Shift to make a second rectangle right above the first one. Select the top rectangle with the Path Selection tool (that's the black arrow) and then use the Pen tool to add an additional point in the middle of the top side. You will then need to click that new point with the Convert Point tool to turn it into a corner. You can then select it with the Direct Selection tool (that's the white arrow) to move it up. Use the same to select the top corner points and move them in to make the peaked roof shape. To make the doorway, just make a new rectangle on the same shape layer, but hold down ALT(PC)/OPT(Mac) to subtract from instead of add to the existing paths. Just so you know, if you were doing this in Illustrator, you would be doing just about the same thing.
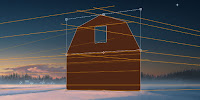 If for some reason you are making this shape in Illustrator, Copy it, then Paste it into Photoshop as a Shape layer. To put it into perspective we'll use the Transform tool. But first, it's a good idea to set up your perspective with vanishing points. Use the Line tool to make a new Shape layer and add as many lines as you need. This is a two-point perspective image and the vanishing points should be outside of the image area. Transform and use Skew to match the barn shape to the right view, using your lines as guides. It's always best to build things flat-on first, getting all your dimensions right, then Transform them into place.
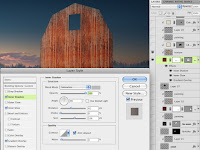
 Use PMS 483 as the fill for this Shape layer. As usual, put some Layer Styles on this layer to liven it up. If you have been following along with previous tutorials, you know what to do. To save some time, I used a photo of old planks of wood as the barn texture. This layer was clipped to the Shape layer and set to Hard Light Blend mode at 70% Opacity. Transform it with Scale and Skew so that it matches the perspective of the vector shape. For a special trick on this one, I used an Inner Shadow of grey set to Saturation to make the wood look bleached and faded at the upper edges and sides of the barn front and beneath the door. Using photos and effects can save a lot of time over painting in all the details, but it can't do everything. I added a new layer to paint in what I couldn't achieve otherwise. You can also add layers for seams in the planks and a cast shadow for the roof overhang. These all work best in Multiply mode. Adjust their Opacity as needed and make sure all of these extra layers are using the barn Shape layer as a clipping mask.
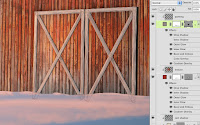 Every barn needs doors, right? Make them with the Rectangle tool on a new Shape layer, but don't clip this one along with the other barn layers. Use the same color and Layer Styles as on the main barn layer, but the doors need a bit more. Add a dark Outer Glow in Multiply mode, a bit of Drop Shadow, and a Bevel and Emboss to show that it sticks out a bit. Copy the wood texture from the barn face and give it the same Blend mode and Opacity. Clip this layer to the doors Shape layer. To make the traditional crossed slats, use the Line tool with PMS 409 to make thick lines on a new Shape layer. Paste the Layer Styles from the barn layer to this layer. Scale these effects down a bit and turn off the Inner Shadow, since you don't need it here. Add a layer mask and paint with black along the bottom to make the slats look like they are behind the snow. Make a new layer to paint some details on and clip it to the main slats Shape layer. Use the same steps to build the small door up in the hayloft, but reverse the Gradient Overlay to brighten the right side of the door. This makes it look like it's sticking out from the building and catching more light.
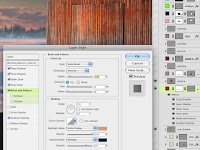
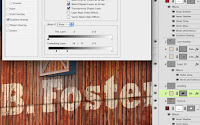 As an added bonus, you can put some kind of messaging or image, painted onto the barn front. Since I initially did this as a corporate Christmas card, I used a company logo, but you could use whatever you want. Place the art or type the message and Transform it into position. At this point, we need it to look like it's painted onto old wood, so it should show gaps and bare areas where the paint has peeled away. An easy way to do this is to use the Blend feature. This extremely powerful but perhaps little used feature of Photoshop is the perfect choice here. Double-click the layer to bring up the Blending Options. In addition to the usual Blend mode, Opacity, and so one, there is a section at the bottom labeled Blend If. This is Photoshopspeak and it really means "make transparent if." Instead of using channels to make a static layer mask, you can do basically the same thing by adjusting these sliders. You can make parts of a layer transparent based on either the pixels on its layer or the pixels on layers underneath. In this case, we want to fade away parts of this layer that are over the darkest parts of the underlying layers to suggest shadows and gaps in the wood. To do this, move the Underlying Layer's black slider to the right and you will see parts of this layer drop away. Pretty cool, huh? The only problem is that the transparency is quite harsh; it's either 0% or 100% and looks extremely jaggy. The solution is to use what has to be one of the least document Photoshop features. Hold down ALT(PC)/OPT(Mac) and move the black slider again. You are now splitting the triangle and anti-aliasing the transition from transparent to opaque. The farther apart you slide the two halves, the softer the transition becomes. This is a great way to make painted signs on old wood, stone, brick, or anything with enough contrast. The best part is that you can move the signage around and the transparency updates.


 Use PMS 483 as the fill for this Shape layer. As usual, put some Layer Styles on this layer to liven it up. If you have been following along with previous tutorials, you know what to do. To save some time, I used a photo of old planks of wood as the barn texture. This layer was clipped to the Shape layer and set to Hard Light Blend mode at 70% Opacity. Transform it with Scale and Skew so that it matches the perspective of the vector shape. For a special trick on this one, I used an Inner Shadow of grey set to Saturation to make the wood look bleached and faded at the upper edges and sides of the barn front and beneath the door. Using photos and effects can save a lot of time over painting in all the details, but it can't do everything. I added a new layer to paint in what I couldn't achieve otherwise. You can also add layers for seams in the planks and a cast shadow for the roof overhang. These all work best in Multiply mode. Adjust their Opacity as needed and make sure all of these extra layers are using the barn Shape layer as a clipping mask.
 Every barn needs doors, right? Make them with the Rectangle tool on a new Shape layer, but don't clip this one along with the other barn layers. Use the same color and Layer Styles as on the main barn layer, but the doors need a bit more. Add a dark Outer Glow in Multiply mode, a bit of Drop Shadow, and a Bevel and Emboss to show that it sticks out a bit. Copy the wood texture from the barn face and give it the same Blend mode and Opacity. Clip this layer to the doors Shape layer. To make the traditional crossed slats, use the Line tool with PMS 409 to make thick lines on a new Shape layer. Paste the Layer Styles from the barn layer to this layer. Scale these effects down a bit and turn off the Inner Shadow, since you don't need it here. Add a layer mask and paint with black along the bottom to make the slats look like they are behind the snow. Make a new layer to paint some details on and clip it to the main slats Shape layer. Use the same steps to build the small door up in the hayloft, but reverse the Gradient Overlay to brighten the right side of the door. This makes it look like it's sticking out from the building and catching more light.


No comments:
Post a Comment