

This early version of the arc reactor has ten wrapped segments, or coils, around the light ring. That divides nicely into 360. Hold down SHIFT to make a square on a new Shape layer with the Rounded Rectangle tool. For the size of a 2" diameter reactor, a Radius of 5 px for the corners works. Make one of the vertical squares first and use PMS 4695 as the color. As in the earlier tutorials, select this shape with the Path Selection tool, Copy/Paste, then Transform. Move the reference point to the center of the design and enter 36 in the Set rotation field. Copy/Paste this new shape, then Transform Again eight more times. This should be the last time we need to do this. Add a Bevel and Emboss, similar to on the other pieces. You may need to adjust the colors.

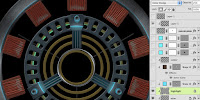 Now for some fun. Use this Shape layer as a Clipping Mask for some new layers above it. Using PMS 175 and a small, hard-edged brush, draw some thin lines across the squares, pointing toward the center. These lines represent copper wire wrapped around these blocks, so they should look a little loose and wiggly. Add a bit of dark Outer Glow and a Bevel and Emboss as shown on this layer. Since if you draw lines too close together they just meld into a bigger blob, you will need two layers of hand-drawn lines to get enough. Make sure both are clipped to the Shape layer with the rounded rectangles. Notice how the highlight from this Clipping Mask layer transfers to and is 'inherited' by the wires. To suggest the corner where the shapes turn down and face the interior, make a new layer, clipped along with the rest, and paint some loose scribbles on it to suggest this edge. The color we will use for the light has a Hue of 188, with Saturation and Value as bright as they can be. We are using HSV (Adobe calls it HSB) instead of Pantone colors is to get the greater saturation needed for luminosity. Change the Blend mode to Color Dodge and lower the Opacity. You can adjust this later depending on how it combines with the layers we have yet to make.
 To get an intense specular highlight along these corners, we need to make a new Shape layer. Instead of using a circle as we did earlier on the three brackets, use the Polygon tool with Sides set to 20. Rotate it so that the straight sides line up with the rounded rectangles. Use our bright blue light color, set the Blend mode to Color Dodge, and lower the Fill to 50%. For a Layer Style, use the same Stroke as on the outer ring and the inner-facing portions of the three wide brackets. Use the bright blue with a Hue of 188 for the Inner Glow, and make an Outer Glow using the settings shown. Clip this layer along with the others to the rounded rectangle Shape layer and see how the the colors along this corner are starting to combine to increase specularity. If you do this successfully, the flat, two-dimensional squares will start to look like three-dimensional cubes that are turned slightly to show a hint of another side.
 To increase the impression of luminosity toward the center, we should darken the far edges of these coils. Make a new vector circle on a Shape layer above the highlights, lower the Fill to 0%, and give it a dark Inner Glow in Multiply mode using the settings shown. Clip it down along with the other layers we have been working on. Adjust the Size to your liking.
 As a final touch, add some blobs of solder on the wire-wrapped sections. These will be the connecting points for two thin wire circles joining them, so you may need to do this later in the process. to get everything to match up. But whenever you do it, paint them with a brush similar to what you used for the wires, but perhaps a bit larger. Use a golden brown color, PMS 464 or something similar. Use the Layer Style on the wires layer for this one. Adjust the Bevel and Emboss as needed; try the settings shown here. Notice how Color Dodge really makes them look like shiny metal. That's just about it. In the last step, we will add the glows that really make the reactor come to life (so to speak).

 Now for some fun. Use this Shape layer as a Clipping Mask for some new layers above it. Using PMS 175 and a small, hard-edged brush, draw some thin lines across the squares, pointing toward the center. These lines represent copper wire wrapped around these blocks, so they should look a little loose and wiggly. Add a bit of dark Outer Glow and a Bevel and Emboss as shown on this layer. Since if you draw lines too close together they just meld into a bigger blob, you will need two layers of hand-drawn lines to get enough. Make sure both are clipped to the Shape layer with the rounded rectangles. Notice how the highlight from this Clipping Mask layer transfers to and is 'inherited' by the wires. To suggest the corner where the shapes turn down and face the interior, make a new layer, clipped along with the rest, and paint some loose scribbles on it to suggest this edge. The color we will use for the light has a Hue of 188, with Saturation and Value as bright as they can be. We are using HSV (Adobe calls it HSB) instead of Pantone colors is to get the greater saturation needed for luminosity. Change the Blend mode to Color Dodge and lower the Opacity. You can adjust this later depending on how it combines with the layers we have yet to make.


No comments:
Post a Comment