

These shapes could be created in Illustrator, but the point of this tutorial is to see how easily you can do it in Photoshop. The first shape is simple; it's just a circle. Use the Ellipse tool to make a Shape layer. I chose PMS 483, which is the top in a great range of reds. This slick, rounded, slightly marbelized look comes all from Layer Styles. All the colors come from this range of 483-489. The Inner Glow uses a dark color in Multiply. The Gradient Overlay is a light color in Color Dodge. The texture is a Pattern Overlay using one of Photoshop's default patterns: Satin with a Scale of 1000% and a Blend mode of Overlay at 7%. This mode drops out midtone grey and keeps the dark and light. The little highlight along the beveled edge can easily be done with Inner Shadow set to Color Dodge and using the Cone Contour as shown.
 The text in the black field can be done in Photoshop and transformed with a Warp mode, but for the curved text, Illustrator is a better choice for creating text on a path. Copy the curved text in Illustrator and paste it in Photoshop as a Smart Object. I don't usually recommend doing it this way, but you can double-click it and re-edit it in Illustrator, which will automatically update in Photoshop. This is handy with curved text, which often needs to be adjusted back and forth.
 Now, for the chair hoops. Use the Rounded Rectangle tool with a huge radius, like 70 pixels or something. Make a very rounded rectangle in PMS 4485. Transform it with Perspective to taper the bottom end. You can also scale it at this point if you need. Then, select the path of the Shape layer with the Path Selection tool (the black arrow). Copy and paste it. You won't see anything new, but it's there. Transform the path and scale it down. You'll see the copied path inside the original one. When it looks good, accept the transformation and with the inner path still selected, click the Subtract from shape area option. Now the inner shape is cutting out a hole from the outer shape.

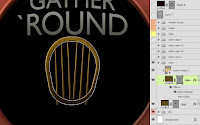 Hold down SHIFT and use the Line tool to add a thick line (which really is a tall, thin rectangle). Select it with the Path Selection tool and use Perspective to taper the top a bit. You can also skew it slightly. Then copy/paste or ALT/OPT + drag it to create some duplicates. When you have one half done, you can select them all, copy/paste, then mirror them horizontally to get the other half. make sure all these paths are on the same Shape layer. Then add some Layer Styles to give it some depth. The Inner Shadow really is a shadow this time and the Gradient Overlay is the default black and white set to Multiply mode. That way, the white goes transparent and you are just left with some darkening to suggest a shadow on the lower part of the chair back. Now, duplicate the layer, then select and delete the inner pieces so that you are left with just the hoop. Clip it to the bottom chair layer. Add an Inner Shadow with a light brown in Linear or Color Dodge, which gives shinier highlights than Screen. Use the Cone Contour and adjust the Distance so that this bright line is just on top of the dark Inner Shadow. Remember that this layer is inheriting the effects from the Clipping Mask layer, but it can have its own as well. This is how you can get more than one instance of the same effect. For the final touch, add a light wood texture to a layer above these two and clip it along with the rest. This one is Soft Light at 100%, but use the settings that work best for you.
 Put all the chair layers into a layer group, then duplicate it. Transform the entire group with Skew, Rotate, and Scale as necessary to make other chairs. You may also need to adjust the Bevel and Emboss or Inner Shadow to give the side chairs more of a highlight or shadow edge. Don't worry about how the bottoms look; that will all get covered up by the table, which we will work on next.


 Hold down SHIFT and use the Line tool to add a thick line (which really is a tall, thin rectangle). Select it with the Path Selection tool and use Perspective to taper the top a bit. You can also skew it slightly. Then copy/paste or ALT/OPT + drag it to create some duplicates. When you have one half done, you can select them all, copy/paste, then mirror them horizontally to get the other half. make sure all these paths are on the same Shape layer. Then add some Layer Styles to give it some depth. The Inner Shadow really is a shadow this time and the Gradient Overlay is the default black and white set to Multiply mode. That way, the white goes transparent and you are just left with some darkening to suggest a shadow on the lower part of the chair back. Now, duplicate the layer, then select and delete the inner pieces so that you are left with just the hoop. Clip it to the bottom chair layer. Add an Inner Shadow with a light brown in Linear or Color Dodge, which gives shinier highlights than Screen. Use the Cone Contour and adjust the Distance so that this bright line is just on top of the dark Inner Shadow. Remember that this layer is inheriting the effects from the Clipping Mask layer, but it can have its own as well. This is how you can get more than one instance of the same effect. For the final touch, add a light wood texture to a layer above these two and clip it along with the rest. This one is Soft Light at 100%, but use the settings that work best for you.


These tutorials are GREAT! Thanks for sharing!
ReplyDeleteI'm glad you like them.
ReplyDeleteAdobe CS5 Serial keys Working
ReplyDelete