

Now it's time to build the table. This turned out to be kind of fun and it is a cool effect. This table is circular, so start with the Ellipse tool to make a Shape layer with PMS 4495. Hold down SHIFT to make a perfect circle. Then transform the circle with Perspective or Skew to make the far end look like it's receding in the distance. I created some perspective lines on a top layer to help out with this. The best way to do transformations like this is to use Full Screen Mode With Menu Bar so that you can work on transformation points outside of your image. You used to be able to switch screen modes back and forth while transforming, but with the release of Photoshop CS4, that feature is now gone for some reason. Thanks so much, Adobe.
 Since the table has some thickness to it, we need to show a bit of the side. Use the Path Selection tool (black arrow), select the tabletop so that you see the vector path, then copy and paste. You won't see anything new, but a new vector shape has been pasted in place above the original on the same Shape layer. Nudge it down with the arrow key and then scale it down a bit. I am using my vertical perspective lines as a guide. You may also need to create a little piece to bridge the gap between the two circles. Make sure the layer is selected with the paths visible, choose the Pen tool, and click the Add to shape area button in the tool options. You need to make sure this new shape stays on this layer and doesn't make a new one.

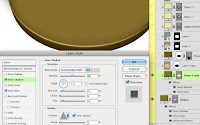 The next step is to copy the tabletop to a new Shape layer. You can just duplicate the layer, select the paths you don't want on the new layer with the Path Selection tool, and delete them. Or you could Select the top circle, copy and paste the path, then choose Layer> New Fill Layer> Solid Color... This will make a new Shape layer using the path you just pasted. Choose the same fill color: 4495. What you want is the tabletop to be in exactly the same position on this new layer. Clip it to the bottom one. On the bottom layer that has the top and side shapes, add a Layer Style. I chose a standard Bevel and Emboss and used Inner Glow in Multiply mode with a dark brown. To show the edge of the table, use an Inner Shadow of 4495 in Multiply mode. Set the Angle to about 90º. Taking the Size up will give you a softer edge, suggesting a more gradual turn at the corner. A crisper edge suggests a sharper, less rounded corner. On the top layer, add an Inner Shadow, but choose a light color and select the Cone Contour to add a glint of highlight around the edge. I chose Color Dodge to give it that extra kick of specularity. This is a great effect and I never get tired of how cool it looks.
 The texture is the one part that has to be raster. I used two different wood photos: one with the grain and one with the plank edges to get just the look I wanted, which was a rustic table. The wood grain layer was set to Soft Light and the planks layer was set to Multiply at 20%. Transform them into position using the same perspective you used for the tabletop shape. You can SHIFT+select both layers to transform them at the same time. The last step is to load a selection from just the tabletop shape and create a layer mask on both texture layers. That way the texture doesn't extend down the side of the table. We'll take care of that in the next step.
 Use a copy of the wood grain texture for the table's edge. Transform it into position using the bottom vanishing point. Don't worry about the plank lines; that would be too hard to match up with the photo texture. Use the Line tool to make another Shape layer with 1px vector lines. Hold down SHIFT to add lines to the same layer and pull them up from the vanishing point to meet the plank lines on the tabletop. For the final step, both of these layers need a mask that is the inverse of the mask on the tabletop layers. CMD(Mac)/CTRL(PC)+click the tabletop layer's mask to load it as a selection. Make sure you have one of the table side's layers selected and click the Add layer mask button. Now you have a mask, but it's the opposite of what you need. Open the Masks panel and click the Invert button. Pretty neat, huh? Do the same for the other side layer and you are done with the table.
For the text, I used Illustrator because of its nice Type on a Path tool. Create a circle in Illustrator and put the type along its path. Then convert the text to outlines, copy, and paste into Photoshop. Choose Shape Layer as your option. You might be tempted to choose Smart Object, but this is a vector Smart Object and you won't be able to use Skew or Perspective, so the Shape layer is the best way to go. Transform it into position just like you did for the tabletop shape and the wood textures. When the angles match up, scale it in a bit by pulling in the edges so that it's not right on the edge of the table.
 The perspective is good, but the text looks like it's sort of floating above the table and we want to make it look like it's painted on. Change the Blend mode to Screen. That's better, but we really want the texture and gaps between the planks to show through. Double+click this layer and change the Blend If options of the Layer Style. This little-used option is really useful, but it's not obvious what it does. Blend If basically means "make transparent if." Grab the black slider of the underlying layer and move it to the right until the grain and gaps show through. What you are doing is making the text layer transparent over the darker areas of layers underneath it. The only problem is that the opacity is either 100% or 0% and we need a bit of fading. For what must be the most hidden feature of Photoshop, hold down ALT/OPT and drag the black slider a bit more. This splits the slider in two. The farther apart these two halves are, the softer the transition between opaque and transparent. How about that?

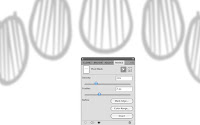 The last step is the reflection on the table to bring it all together. The more reflective a surface is, the sharper and stronger the reflection will be. For a diffuse surface, the reflection will be fainter and softer. Create a new layer in Multiply mode and add a black to transparent gradient. Add a layer mask, load selections from the chairs, transform the selections, and Flip Vertical. Move them around so that they match up where the chair reflections should be and fill the mask with black with the selection still active. The problem is that the reflection is too sharp and strong. In the past, you would need to fade your fill, then apply a Gaussian Blur to the mask, but these are permanent changes. However, with CS4 you have the Masks panel. Take the Density down to 25% and the Feather to 7px. What is cool is that you can come back and adjust these settings if the blur isn't right or if you need the effect of the mask to be more or less. I've been waiting for this feature for a long time, so it's great to finally see it implemented.


 The next step is to copy the tabletop to a new Shape layer. You can just duplicate the layer, select the paths you don't want on the new layer with the Path Selection tool, and delete them. Or you could Select the top circle, copy and paste the path, then choose Layer> New Fill Layer> Solid Color... This will make a new Shape layer using the path you just pasted. Choose the same fill color: 4495. What you want is the tabletop to be in exactly the same position on this new layer. Clip it to the bottom one. On the bottom layer that has the top and side shapes, add a Layer Style. I chose a standard Bevel and Emboss and used Inner Glow in Multiply mode with a dark brown. To show the edge of the table, use an Inner Shadow of 4495 in Multiply mode. Set the Angle to about 90º. Taking the Size up will give you a softer edge, suggesting a more gradual turn at the corner. A crisper edge suggests a sharper, less rounded corner. On the top layer, add an Inner Shadow, but choose a light color and select the Cone Contour to add a glint of highlight around the edge. I chose Color Dodge to give it that extra kick of specularity. This is a great effect and I never get tired of how cool it looks.

For the text, I used Illustrator because of its nice Type on a Path tool. Create a circle in Illustrator and put the type along its path. Then convert the text to outlines, copy, and paste into Photoshop. Choose Shape Layer as your option. You might be tempted to choose Smart Object, but this is a vector Smart Object and you won't be able to use Skew or Perspective, so the Shape layer is the best way to go. Transform it into position just like you did for the tabletop shape and the wood textures. When the angles match up, scale it in a bit by pulling in the edges so that it's not right on the edge of the table.


 The last step is the reflection on the table to bring it all together. The more reflective a surface is, the sharper and stronger the reflection will be. For a diffuse surface, the reflection will be fainter and softer. Create a new layer in Multiply mode and add a black to transparent gradient. Add a layer mask, load selections from the chairs, transform the selections, and Flip Vertical. Move them around so that they match up where the chair reflections should be and fill the mask with black with the selection still active. The problem is that the reflection is too sharp and strong. In the past, you would need to fade your fill, then apply a Gaussian Blur to the mask, but these are permanent changes. However, with CS4 you have the Masks panel. Take the Density down to 25% and the Feather to 7px. What is cool is that you can come back and adjust these settings if the blur isn't right or if you need the effect of the mask to be more or less. I've been waiting for this feature for a long time, so it's great to finally see it implemented.


No comments:
Post a Comment