
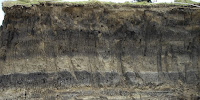
A dirt material was applied to the base geometry in Cinema 4D, but the render came out looking flat and smooth. It needs some realistic texture applied in Photoshop to to make it look rough and natural, more like real dirt. In the past, I have painted dirt by hand or tried a combination of filters to get the right look, but that is time consuming and doesn't end up looking very real. I decided to create the texture from a photo. A couple of years ago, as I was traveling through Guatemala, we were stopped to wait for road construction (that happens a lot there). Near the road was a section of earth that had been cut away, leaving this great cross section of dirt, so I took some photos. This is why it's always a good idea to carry around your camera with you.

Drag the photo over and transform it into position using Distort or Skew. Change the blend mode to Luminosity. Now, only the dark and light values of the photo are affecting the image behind it; the hue remains unchanged. Duplicate the photo layer and experiment with blend modes and opacity. I ended up with Normal at 70%. Photo-based textures tend to look better if you combine several different images with different blend modes and opacities, instead of just using one photo.
Select the angled part on the left and skew it a bit more to follow the plane of the original 3D model. For the little sliver that faces to the side, you can just paint it by hand. Choose a simple brush with the Opacity Jitter set to stylus and hold down ALT/OPT to pick colors from the surrounding areas. Start big and work down to the smaller details. Continue the different bands along this face and pick new colors often to add more color diversity.

To make the roadway look like it's hanging over the dirt a bit and casting a shadow, create a new layer and make a selection along the edges of the roadway with the Polygonal Lasso tool. Fill it with any color and add a Layer Style. Set the Fill to 0% so that the pixels on the this layer will be transparent, but the effects will still be visible. Give it a Drop Shadow and adjust the settings similar to what you see here. Remember to uncheck Use Global Light, so that other effects won't change. The scene was rendered as a multi-pass, so I've got separate layers for the shadow and ambient occlusion calculated by Cinema 4D. These layers were dragged over on top of the photo and paint layers to add greater realism.

One of the products shown in this illustration is a pump for water deep underground. The dirt cutaway needs to have a cavity with water in it. Paint a rough hole using a dark brown picked from the surrounding dirt. Let the cracks and contours of the texture be a guide as you paint the edge. Give it a dark Outer Glow in Multiply mode and a Bevel and Emboss using settings like these. Color Dodge for the highlight will not affect the darker areas as much as Screen would. The Chisel Hard Technique makes the edge rougher and more angular. Reduce the Fill of this layer to 80%.

For the water, create a shape layer using the Pen tool and clip it to the void layer. Use a dark blue as the fill color and add an Inner Glow of light blue in Screen mode. Yes, sometimes, I actually use light glows. A light blue stroke represents the edge of the water cutaway. Reduce the Fill to 70% so that the water becomes somewhat transparent, but the Layer Styles remain unaffected. A light blue shape on top represents the top of the water. Because both these layers use the void layer as a clipping mask, they inherit its Fill setting of 80%.
As a final touch, roughen up the edges by painting on the mask of the bottom render layer. As before, let the cracks and contours be your guide on where to cut away the edge. This will help sell the idea that it's rough, loose dirt. That should about do it. Now we have what looks like a chunk that is cut out and removed from the surrounding ground and it's about as realistic looking as something like this could be.


 A dirt material was applied to the base geometry in Cinema 4D, but the render came out looking flat and smooth. It needs some realistic texture applied in Photoshop to to make it look rough and natural, more like real dirt. In the past, I have painted dirt by hand or tried a combination of filters to get the right look, but that is time consuming and doesn't end up looking very real. I decided to create the texture from a photo. A couple of years ago, as I was traveling through Guatemala, we were stopped to wait for road construction (that happens a lot there). Near the road was a section of earth that had been cut away, leaving this great cross section of dirt, so I took some photos. This is why it's always a good idea to carry around your camera with you.


No comments:
Post a Comment