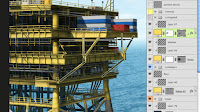
 The last major pieces still missing are the different levels of the platform. Build these as Shape layers, just like you have done on the others. Use PMS 123 and the Line, Rectangle, or Pen tool. Be sure to follow your vanishing point guides. You can Copy and Paste the initial railings from previous layers. That's why it's good to keep the untransformed versions of these shapes. If the transformed railing sticks out past where you need it, hold down Shift and create a new rectangle or similar shape on this layer. Then, select it with the Path Selection tool and click the Subtract from shape area (-) button. That selected shape now acts as a vector mask, hiding the paths it intersects. As with earlier steps, create a new layer for painted details and one in Multiply mode for the shadows. It shouldn't take many more layers to finish this section off.
Next are some walls of corrugated metal. Again, make them as vector Shape layers using PMS 428. Use the Line tool and hold down Shift to make the vertical beams that stick up a bit. Use the Rectangle tool and hold down ALT (PC)/OPT (Mac) to cut out that open area in the middle. Use the same vertical lined texture in Luminosity mode as on the cargo containers and clipped layers for painted details and shadows.
Build the outer stairway with (you guessed it) the Line tool on a Shape layer. for the little stairs, make a pattern of thin, horizontal white and black lines and fill a new layer with it. Change its Blend mode to Multiply and lower the opacity a bit. Use Transform >Skew to make the pattern match up with your perspective lines. Clip it down to your Shape layer and mask out any areas where you don't want to see the stairs. Add the usual detail and shadow layers.
This rig is almost done, but it needs just a few more details and doodads. These can all be painted on one layer above everything else. You can add poles, lamps, pipes, tubing, lifesaving rings (at least, I think that's what they are) on the railing, and so on. That does it! Now, there's the other platform...


No comments:
Post a Comment