This image also has another kind of platform that is more in the foreground. The same techniques as on the previous one were used for this one, so I won't go into as much detail. I will show you the steps, but it's going to be very similar to how the yellow rig was built. Start with the Rectangle tool to make a Shape layer. Use PMS 484 as the base color. Add a linear Gradient Overlay of 296 to transparent in Multiply mode to add a nice shadow to the column. Use an Inner Shadow of 290 in Color Dodge to give the left edge a bit of highlight. Sometimes I use this method instead of Bevel and Emboss because Inner Shadow gives you a bit more control. Add a layer mask and paint out in black where the column meets the water. Check Layer Mask Hides Effects in the Blending Options section of the Layer Style so that the layer's effects won't follow the new edge created by your mask.

I'll assume that by now, you know you will paint the details on a new layer that uses the Shape layer as a clipping mask and put the shadows on a layer in Multiply mode that is also clipped. Use a vanishing point on the horizon and draw perspective lines from it with the Line tool. This should be on a Shape layer near the top of your layers stack and will be the guides for this platform. The main shapes were made with the Pen, Rectangle, Rounded Rectangle, and Line tools as vector shapes all on one Shape layer using 419 as the color. I rarely use pure black or white. The ranges of greys in the PMS library are really more versatile. Here's how it looks with some details painted in. I chose colors directly from my photographic source material. All the details were painted on one layer with a shadow layer on top, this time at 100% Opacity for some really dark and drastic shadows. Foreground objects can have more contrast and extreme values than objects farther back.

Use as many layers as you need to add all the detail. Again, start with vector shapes and use them as clipping masks for your painted layers. This rig has a yellow railing, but it's a bit more of a mustard color than the yellow platform, so use PMS 458. Make sure all lines that are parallel to the ocean or ground plane converge at the horizon somewhere. You can see how much the perspective guides help here. If you want to paint a straight line that isn't vertical or horizontal, you can make a selection with the Polygonal Lasso tool, fill it with a color, then keep painting on top of it.

This rig has some interesting vertical pipes mounted on the outside. Use the Rounded Rectangle tool to make the main shapes, then use the Ellipse tool to add in the round areas. The Inner Shadow is 290 in Color Dodge mode, so it's acting as a highlight, just like on the big column. It also has Bevel and Emboss for the shadow on the right edge. You can use this technique if you want the highlight and shadow to have different sizes or edge sharpness. If you do them both with Bevel and Emboss, they will look the same. There is also a 296 Gradient Overlay in Multiply mode to darken the bottom of the pipes.

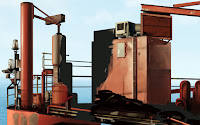
This collection of tubes, ducts, and whatnot was made in the same way with PMS 416. The Shape layer has an Inner Glow of 411 in Multiply mode to give it a dark, rusty feel. The pipe with the elbow bend can be made with the Pen tool and carefully adjusting your curves, or by subtracting one rounded rectangle from another. Hopefully, you can see that the painting is quite loose. It was all done with the Chalk 11 pixel and Pencil - Thin brushes, two of my favorites and some of Photoshop's most useful. Their Opacity Jitter is set to Pen Pressure, and the size is adjusted as needed. That's about it; the platform almost looks done. In the next tutorial, we will wrap up the entire image.


 I'll assume that by now, you know you will paint the details on a new layer that uses the Shape layer as a clipping mask and put the shadows on a layer in Multiply mode that is also clipped. Use a vanishing point on the horizon and draw perspective lines from it with the Line tool. This should be on a Shape layer near the top of your layers stack and will be the guides for this platform. The main shapes were made with the Pen, Rectangle, Rounded Rectangle, and Line tools as vector shapes all on one Shape layer using 419 as the color. I rarely use pure black or white. The ranges of greys in the PMS library are really more versatile. Here's how it looks with some details painted in. I chose colors directly from my photographic source material. All the details were painted on one layer with a shadow layer on top, this time at 100% Opacity for some really dark and drastic shadows. Foreground objects can have more contrast and extreme values than objects farther back.


No comments:
Post a Comment