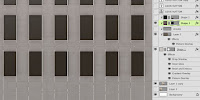
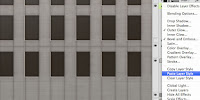
Upon closer inspection of the photo, some lines or seams become visible. To make these, use the Line tool to make a new vector Shape layer. Set the Weight to 1 pixel and use Warm Grey 11. Hold down Shift to add additional lines to the same layer and constrain them vertically or horizontally. For their effects, you can copy them from the windows layer. Right+click on that layer and choose Copy Layer Style, then right+click on this lines layer and choose Paste Layer Style. All we need here are the Outer Glow and Bevel and Emboss, so turn off the other styles. Lower the layer's Fill to 40%, make sure the lines layer is using the main building layer as a clipping mask, and they're done.
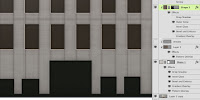
For the doors and display windows, use the Rectangle tool to make a new Shape layer. Use PMS 419. Since there are only two sizes of rectangles, make one of each, select them with the Path Selection tool, then duplicate them and slide them over. Line them up with your guides or select them all and click the Distribute horizontal centers button to space them out evenly. Copy, then Paste the Layer Style from the lines to this layer.
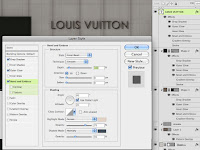
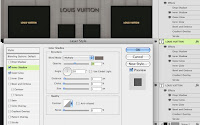
To make the signs attached to the building, use the Type tool. I don't know for sure the typeface that Louis Vuitton uses for their logo, but Century Gothic regular looked like a close match. It needs a dark Outer Glow, similar to what is on the lines and windows. It also needs a bit of Drop Shadow. Set the Size to 0 so that it is nice and sharp. A hint of Bevel and Emboss will help out as well, but it needs to be very small. As you can see, you can set the Size to 0 and there is still a bit there. For the illuminated signs, use the same typeface, but this time in bold. Give them a bit of Outer Glow, this time in the default Screen mode. A little Inner Shadow gives them a look that matches the photo.
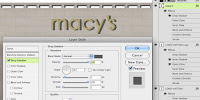
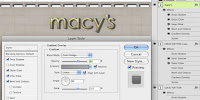
Century Gothic also seemed to match the Macy's logo. Use PMS 4515. We need to make this sign look like it's metallic, shiny, and standing out from the building wall a bit. Layer Styles should do that for us. Use the Drop Shadow settings as shown. Taking the Spread up to 100% will keep the edge sharp, so if you take the Size up a bit, the shadow widens out and attaches better to the shape. Just like the other elements, this sign needs a dark Outer Glow and a little bit of Bevel and Emboss. For the shiny, metallic look, use a Gradient Overlay. Try a light Cool Grey in Color Dodge as shown. It looks pretty good, so I'd say this part is done. What's really cool about what we have done so far is that since it's all done with vector shapes and Layer Styles, this image is pretty much resolution independent. If you use Image Size to scale the image up and make sure the Scale Styles option is checked, everything should be fine.


 Upon closer inspection of the photo, some lines or seams become visible. To make these, use the Line tool to make a new vector Shape layer. Set the Weight to 1 pixel and use Warm Grey 11. Hold down Shift to add additional lines to the same layer and constrain them vertically or horizontally. For their effects, you can copy them from the windows layer. Right+click on that layer and choose Copy Layer Style, then right+click on this lines layer and choose Paste Layer Style. All we need here are the Outer Glow and Bevel and Emboss, so turn off the other styles. Lower the layer's Fill to 40%, make sure the lines layer is using the main building layer as a clipping mask, and they're done.

 To make the signs attached to the building, use the Type tool. I don't know for sure the typeface that Louis Vuitton uses for their logo, but Century Gothic regular looked like a close match. It needs a dark Outer Glow, similar to what is on the lines and windows. It also needs a bit of Drop Shadow. Set the Size to 0 so that it is nice and sharp. A hint of Bevel and Emboss will help out as well, but it needs to be very small. As you can see, you can set the Size to 0 and there is still a bit there. For the illuminated signs, use the same typeface, but this time in bold. Give them a bit of Outer Glow, this time in the default Screen mode. A little Inner Shadow gives them a look that matches the photo.
 Century Gothic also seemed to match the Macy's logo. Use PMS 4515. We need to make this sign look like it's metallic, shiny, and standing out from the building wall a bit. Layer Styles should do that for us. Use the Drop Shadow settings as shown. Taking the Spread up to 100% will keep the edge sharp, so if you take the Size up a bit, the shadow widens out and attaches better to the shape. Just like the other elements, this sign needs a dark Outer Glow and a little bit of Bevel and Emboss. For the shiny, metallic look, use a Gradient Overlay. Try a light Cool Grey in Color Dodge as shown. It looks pretty good, so I'd say this part is done. What's really cool about what we have done so far is that since it's all done with vector shapes and Layer Styles, this image is pretty much resolution independent. If you use Image Size to scale the image up and make sure the Scale Styles option is checked, everything should be fine.


Nice site.
ReplyDeleteIs it possible to do this with a vector logo that has already been made in illustrator? I keep searching the web, but nothing pops up.
ReplyDelete