

To start out, we'll need a photo of the building; this isn't the kind of stuff you can just make up. For this project, we'll use the corner Macy's building. The photo isn't great quality, but it will do. The first thing to do is to Transform the photo so that all the lines are horizontal and vertical, at least as much as is possible. Guides will really help out with this task. In fact, you will probably need lots of them before this image is done. I have been ridiculed by co-workers for the amount of guides I use, but in cases like this, they are really important.
 Start by using the Rectangle tool to make a vector Shape layer with Warm Grey 3. You can build it right on top of the photo. Try to work in increments of 10, 20, 50, 100, and so on. It will make things easier later on. Much of the work here is going to be done with Layer Styles. As you can see, I am using a lot here, much like I have done on earlier projects. There is a grey Inner Glow in Multiply mode, a subtle Gradient Overlay in Multiply mode to darken the bottom half of the building, a small Bevel and Emboss, a Pattern Overlay of just thin lines that make a grid, but the surprise here is the Drop Shadow. It's being used to create a bit of the side of the building. If the Size is set to 0, the Blend mode to Normal, and the Opacity to 100%, you get a nice hard edge. Since this view will be from the bottom and the right, adjust the Angle so you can see the bottom and right edges.
 If you are wondering how to make the holes at the top, use the Rectangle tool again, make sure the Shape layer is selected and the path visible, then hold down ALT/OPT. You should see a little minus sign (-) next to your cursor. Make a small rectangle and presto! You have cut a hole out of the building. Use the Path Selection tool (that's the black arrow) to select the rectangle. You can either Copy and Paste it, or you can ALT/OPT + drag it to make a copy. When you have all the holes you need, select them all with the Path Selection tool, then use Photoshop's Align and Distribute buttons to align all these small rectangles to the same baseline and distribute their horizontal centers. What could be easier?
 To add a bit more texture to the wall's surface, make a new layer and clip it to the vector Shape layer. Fill it with a color; any color will do. Take the Fill down to 0%, then add some kind of brick Pattern Overlay. I chose one that has randomly-sized bricks. Experiment with Opacity and Blend mode until it looks good. The idea here is just to add a subtle hint of texture.

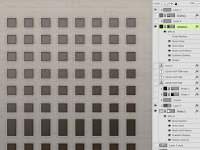 For the windows, use the Rectangle again with PMS Black 4. Hold down Shift to make a square. Make the duplicates and align them in the same way you did the holes at the top. Once you have the top row in, click the Combine button to make them a compound path. Now you can easily select the row of windows as one element. Make the duplicate rows. For architectural images, it's crucial to keep things perfectly centered and aligned. Make sure the margin to the left and right edges of the buildings is the same. Using the guides becomes almost necessary at this point. For the taller windows at the bottom, you can Scale them vertically. Now, it's time for the effects. That will really pull things together. Dark Inner and Outer Glows in Multiply mode should be standard. A small outer Bevel and Emboss helps to inset the windows a bit, but the real surprise is a 2-pixel inner Stroke in Black 4 to suggest a bit of the frame. To top it off, add a cool grey foreground-to-transparent Gradient Overlay from the upper left in Screen mode to show a bit of sky reflection. Make sure this window layer is not clipped to the main building shape layer; it will need to act as a clipping mask for other layers later on.
This is a good start, but now we need to work on the details. Tune in next time for that.


No comments:
Post a Comment