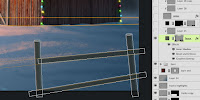
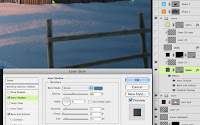
At this point, the image could be considered done, but something in the foreground would tie the scene together and add some depth. A rustic fence would be a nice touch. For this, we need some long, thin vector rectangles. You could use the Rectangle tool, but the Line tool set to a very high Weight might be a better way to go. Make a new Shape layer using PMS 418. Use your perspective lines as guides so that the fence looks correct. To make the vertical posts look round, hold down SHIFT and put some ovals on top with the Ellipse tool. You may need to select them and rotate them slightly. Add Layer Styles similar to what you have been using. The Highlight of the Bevel and Emboss should be in Color Dodge Mode. The Gradient Overlay should be using Multiply and a blue from the background to add more shadow the the right edge. An Inner Shadow with the settings shown will show some rimlight on the right edge, reflected from the snow. Use this layer as a clipping mask for a new layer above it and paint in some details like the rough would grand and the edges of the boards. You can see how using vector shapes here is better than pixel-based shapes because the fence edges can extend past the canvas size. That way the Layer Styles won't stop at the edge of the image.
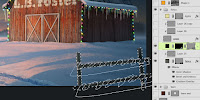
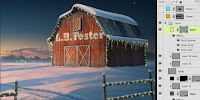
Make a cord wrapping around the fence using the same steps that you used for the light cords on the barn. Copy the Layer Style from the barn cords and paste it on this layer. That way you get the effects and the blend options. Load the fence shapes as a selection for the layer mask. Add new layers for snow and paint it on the top areas of the fence using the same colors and technique as on the barn's roof. For the Christmas lights wrapped around the fence, follow the same steps as on the barn's lights. For contrast, I decided to make this lights a different color. The settings are the same as on the other lights, but the color and Outer Glow were changed to a warm yellow. I used the Path Selection tool (the black arrow) to position each vector circle precisely on the cord. When these details are in place, your holiday illustration is complete. Now your next Christmas card is all done.


 At this point, the image could be considered done, but something in the foreground would tie the scene together and add some depth. A rustic fence would be a nice touch. For this, we need some long, thin vector rectangles. You could use the Rectangle tool, but the Line tool set to a very high Weight might be a better way to go. Make a new Shape layer using PMS 418. Use your perspective lines as guides so that the fence looks correct. To make the vertical posts look round, hold down SHIFT and put some ovals on top with the Ellipse tool. You may need to select them and rotate them slightly. Add Layer Styles similar to what you have been using. The Highlight of the Bevel and Emboss should be in Color Dodge Mode. The Gradient Overlay should be using Multiply and a blue from the background to add more shadow the the right edge. An Inner Shadow with the settings shown will show some rimlight on the right edge, reflected from the snow. Use this layer as a clipping mask for a new layer above it and paint in some details like the rough would grand and the edges of the boards. You can see how using vector shapes here is better than pixel-based shapes because the fence edges can extend past the canvas size. That way the Layer Styles won't stop at the edge of the image.
 Make a cord wrapping around the fence using the same steps that you used for the light cords on the barn. Copy the Layer Style from the barn cords and paste it on this layer. That way you get the effects and the blend options. Load the fence shapes as a selection for the layer mask. Add new layers for snow and paint it on the top areas of the fence using the same colors and technique as on the barn's roof. For the Christmas lights wrapped around the fence, follow the same steps as on the barn's lights. For contrast, I decided to make this lights a different color. The settings are the same as on the other lights, but the color and Outer Glow were changed to a warm yellow. I used the Path Selection tool (the black arrow) to position each vector circle precisely on the cord. When these details are in place, your holiday illustration is complete. Now your next Christmas card is all done.


This is what I have been searching in many websites and I finally found it here. Amazing article. I am so impressed. Could never think of such a thing is possible with it...I think you have a great knowledge especially while dealings with such subjects.
ReplyDeleteclipping path
Goodness, such a stunning post!! Iv'e been needing to find insight, for example, this for quite a while. When I googled it your online journal popped up. The majority of my answers right in this single post. Much appreciated such a great amount for imparting :)
ReplyDeleteclipping path service provider