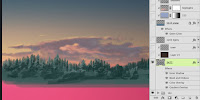
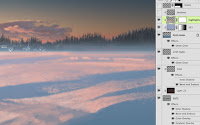
If you know where the horizon is, it's easy to paint in background elements like forests or mountains, because they should pretty much just sit right on it. For the tree-covered hills, start with PMS 5477 as a base. You can choose the lighter and darker swatches in this same strip as needed. Notice how the painting is loose and not very detailed. These colors are way too dark and saturated, but they are good evergreen tree colors. We can take care of this with layer styles. Effects like Color Overlay, Gradient Overlay, and Bevel and Emboss will give the look we need. The idea is to push it back with atmospheric perspective. Photoshop's effects can really help with this. You can also add additional layers in Color mode, clipped to the base layer, to tint it further.
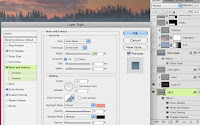
The little village is painted with very simple shapes. Remember that the rooftops should be covered with snow. The Bevel and Emboss' highlight in Linear Dodge adds a nice highlight along the edges to suggest the setting sun. The shadow's Opacity is set to 0% because we don't need it here. Clip this layer along with the others to the tree/hill layer. Paint the windows on a separate layer so you can give them a bit of Outer Glow. Don't include them with the clipping mask layers because we don't want them to be affected by the atmospheric perspective as much as the other layers. The windows' luminosity will cut through the haze more than the buildings or trees. Paint a large field of PMS 5415 on a new layer for the snow. This range of greyish-blue is great to use for snow, especially in shadow. The key here is to remember that snow isn't white. A bit of light blue Outer Glow completes the look of the frosty haze.
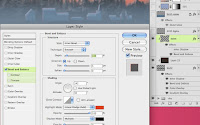
Use the snow layer as a clipping mask for the details painted on other layers. A 535-to-transparent Linear gradient on a new layer will lighten the background. Keep the greatest contrast of dark to light in the foreground area. The highlights from the setting sun are painted on yet another layer, also clipped to the 5415 snow layer. The colors used here are quite pink, but that's okay. Strong colors can work in situations like this. I mostly used my favorite basic brushes here, but some scatter brushes were also used, as you can see.
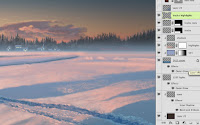
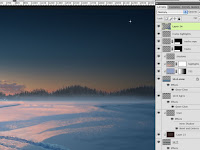
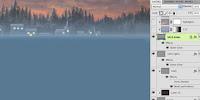
Use PMS 5405 or 5395 to paint the shadow layers. Don't forget to set the layers' Blend mode to Multiply. For the sled tracks, I ended up using Overlay for the main portion, then Multiply for the shadow areas. The highlights are painted on a layer in Normal mode to make them look more dense and substantial. Just pick colors from the highlight areas you have already painted. Now zoom out and see how it all looks. We are trying to get a luminous feel on the left side of the image. Darkening the right side may help to achieve this. If necessary, add a gradient on another layer in Multiply mode and play around with the Opacity until you like it. Something like this should work.


 If you know where the horizon is, it's easy to paint in background elements like forests or mountains, because they should pretty much just sit right on it. For the tree-covered hills, start with PMS 5477 as a base. You can choose the lighter and darker swatches in this same strip as needed. Notice how the painting is loose and not very detailed. These colors are way too dark and saturated, but they are good evergreen tree colors. We can take care of this with layer styles. Effects like Color Overlay, Gradient Overlay, and Bevel and Emboss will give the look we need. The idea is to push it back with atmospheric perspective. Photoshop's effects can really help with this. You can also add additional layers in Color mode, clipped to the base layer, to tint it further.
 The little village is painted with very simple shapes. Remember that the rooftops should be covered with snow. The Bevel and Emboss' highlight in Linear Dodge adds a nice highlight along the edges to suggest the setting sun. The shadow's Opacity is set to 0% because we don't need it here. Clip this layer along with the others to the tree/hill layer. Paint the windows on a separate layer so you can give them a bit of Outer Glow. Don't include them with the clipping mask layers because we don't want them to be affected by the atmospheric perspective as much as the other layers. The windows' luminosity will cut through the haze more than the buildings or trees. Paint a large field of PMS 5415 on a new layer for the snow. This range of greyish-blue is great to use for snow, especially in shadow. The key here is to remember that snow isn't white. A bit of light blue Outer Glow completes the look of the frosty haze.

 Use PMS 5405 or 5395 to paint the shadow layers. Don't forget to set the layers' Blend mode to Multiply. For the sled tracks, I ended up using Overlay for the main portion, then Multiply for the shadow areas. The highlights are painted on a layer in Normal mode to make them look more dense and substantial. Just pick colors from the highlight areas you have already painted. Now zoom out and see how it all looks. We are trying to get a luminous feel on the left side of the image. Darkening the right side may help to achieve this. If necessary, add a gradient on another layer in Multiply mode and play around with the Opacity until you like it. Something like this should work.


No comments:
Post a Comment