To finish up the barn, let's start with eaves. Make a vector Shape layer with the Pen tool and use PMS 447. Give it a Color Overlay of 5404 in Multiply mode to put it in shadow and an Inner Shadow as shown to create a nice highlight edge. Make a new layer to paint some details on and clip it to the Shape layer.
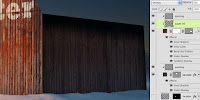
Turn on the perspective lines as guides and use the Pen tool again to make the side of the barn. Use something like PMS 4695 and add the usual Layer Styles. Add an Inner Shadow as Shown to suggest the overhang of the roof. The same Color Overlay as on the eaves will put the whole side in shadow. Add a layer mask and paint out a bit of the bottom to show the snow around it. Just like on the front, put the same wood texture on a new layer, using the Shape layer as a clipping mask. Change its Blend mode to Overlay and the Opacity to 50%. Add another clipped layer and paint some rough stains and streaks on it to complete the look.


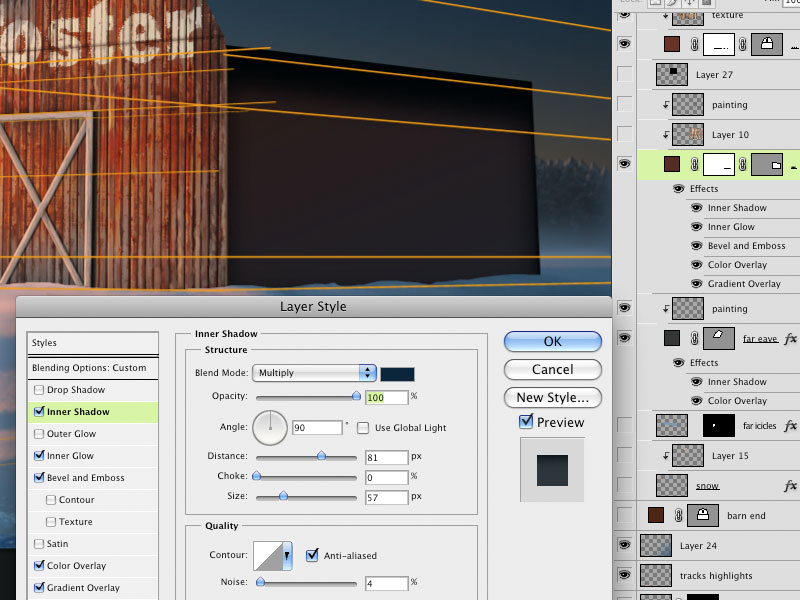
With your perspective lines as guides again, use the Pen tool to make a new vector Shape layer with 447 as the color. Copy the Inner Shadow from the far eaves layer to this one to give it the same edge highlight. Add a Bevel and Emboss and maybe a Gradient Overlay in Color mode with a blue from the ramp of PMS colors you are using for the snow to put a nice, snowy feel in there. For the roof texture, I must have been feeling a bit lazy, or perhaps it was because of a tight deadline, but I used a photo of old corrugated metal instead of painting it on. To make it look less like a photo, I used Color Dodge mode to bring out just the highlights and then lowered the Opacity. It ended up looking nice and frosty. Depending on the photo you have, you might need to try other Blend modes. I ended up using other photos of old wall textures in Multiply mode to create a look that was a composite image. This is a good way to go beyond just simple photos and create unique textures. Remember to Transform them into position so that they match the perspective of the scene. You may need to add a final layer of painted details to tie everything together. All of these layers should be clipped to the vector Shape layer of the roof.

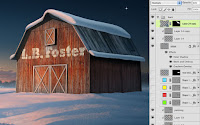
What we really need now is some snow on the roof. Use a simple Brush to paint on a new layer with PMS 5415. To get the look of snow, add a large Bevel and Emboss as shown. Take the Opacity of the Shadow down to 0%, since we don't need it. To complete the look, a bit of Inner Shadow along the bottom in Screen mode will give a nice feel of reflected light. You may wonder why not just use the Shadow of the Bevel and change it to Screen, but we need a much smaller shape here, and the Bevel and Emboss' shadow would be just as large as the Highlight. Inner Shadow gives just the amount of control here that is needed. Use this layer as a clipping mask for some new layers where you paint on the light of the setting sun. Pick colors from the highlight areas of the snow on the ground. Load the snow layer and the roof layer as a selection and use that as a mask for a new layer on top of it all. Put a foreground-to-transparent gradient on it, using a blue from the shadow areas of the snow. Change its Blend mode to Multiply and lower the Opacity as needed. This will make the far edge of the barn recede further into shadow. Don't forget to use the same steps to make some snow under the far eaves layer. Also, paint some black on a new layer behind the open hayloft door so that it looks really dark in there. Now the barn is finished and ready for decorations!


 Turn on the perspective lines as guides and use the Pen tool again to make the side of the barn. Use something like PMS 4695 and add the usual Layer Styles. Add an Inner Shadow as Shown to suggest the overhang of the roof. The same Color Overlay as on the eaves will put the whole side in shadow. Add a layer mask and paint out a bit of the bottom to show the snow around it. Just like on the front, put the same wood texture on a new layer, using the Shape layer as a clipping mask. Change its Blend mode to Overlay and the Opacity to 50%. Add another clipped layer and paint some rough stains and streaks on it to complete the look.
 With your perspective lines as guides again, use the Pen tool to make a new vector Shape layer with 447 as the color. Copy the Inner Shadow from the far eaves layer to this one to give it the same edge highlight. Add a Bevel and Emboss and maybe a Gradient Overlay in Color mode with a blue from the ramp of PMS colors you are using for the snow to put a nice, snowy feel in there. For the roof texture, I must have been feeling a bit lazy, or perhaps it was because of a tight deadline, but I used a photo of old corrugated metal instead of painting it on. To make it look less like a photo, I used Color Dodge mode to bring out just the highlights and then lowered the Opacity. It ended up looking nice and frosty. Depending on the photo you have, you might need to try other Blend modes. I ended up using other photos of old wall textures in Multiply mode to create a look that was a composite image. This is a good way to go beyond just simple photos and create unique textures. Remember to Transform them into position so that they match the perspective of the scene. You may need to add a final layer of painted details to tie everything together. All of these layers should be clipped to the vector Shape layer of the roof.
 What we really need now is some snow on the roof. Use a simple Brush to paint on a new layer with PMS 5415. To get the look of snow, add a large Bevel and Emboss as shown. Take the Opacity of the Shadow down to 0%, since we don't need it. To complete the look, a bit of Inner Shadow along the bottom in Screen mode will give a nice feel of reflected light. You may wonder why not just use the Shadow of the Bevel and change it to Screen, but we need a much smaller shape here, and the Bevel and Emboss' shadow would be just as large as the Highlight. Inner Shadow gives just the amount of control here that is needed. Use this layer as a clipping mask for some new layers where you paint on the light of the setting sun. Pick colors from the highlight areas of the snow on the ground. Load the snow layer and the roof layer as a selection and use that as a mask for a new layer on top of it all. Put a foreground-to-transparent gradient on it, using a blue from the shadow areas of the snow. Change its Blend mode to Multiply and lower the Opacity as needed. This will make the far edge of the barn recede further into shadow. Don't forget to use the same steps to make some snow under the far eaves layer. Also, paint some black on a new layer behind the open hayloft door so that it looks really dark in there. Now the barn is finished and ready for decorations!


No comments:
Post a Comment