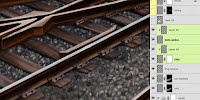
Now it's time to finish this part up. We need to paint on the final details to make it look as realistic as we can. Rails tend to look rough and rusty, except on the top, which is polished smooth and shiny by the continual movement of the wheels over it, so it reflects the color of the sky. Make a new layer to do some quick, loose painting. The mask is the alpha channel of this geometry that was rendered from Cinema 4D. The next layer is for shadows. I painted those with PMS 296 on a layer in Multiply mode and used the same alpha channel for a mask. The next layer is for the pieces at the intersection, called a frog because they supposedly look like a frog (I don't really see it, either). Now the rails are looking done. The last details like the clips that hold them down can be added. As usual, the main shape was created as a solid color on its own layer, then the details were painted on a layer above it, then clipped to the bottom layer.
For the railing, I used the rendered alpha channel and used it as the mask for this layer. Notice how the painting can be very loose and indistinct and yet with the clean edges of the mask and the 3D render underneath, it looks okay. Depending on the complexity of the model and its overlapping areas, several alpha channels may have to be rendered. But this will be enough and the other details can be added on separate layers.

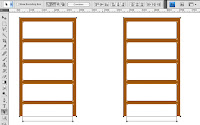
Whenever possible, try to use vector shape layers to keep clean edges and maximize editability. For the framework around the screens, start with the Rectangle tool. Make sure the Shape Layers option is chosen at the upper left of the Options top bar. After making the rectangle, hold down the ALT/OPT key to subtract from the current shape and put holes in the rectangle, making it look like a frame with crossbars. Use the Path Selection tool (the black arrow) to select all the separate shapes on the one shape layer. Now you can copy and paste these shapes or just ALT/OPT+drag them to make a copy. Notice that with the Path Selection tool active and paths selected, some very helpful options become available. A number of Align and Distribute buttons can be used to make sure the shapes are evenly spaced out. Click the large Combine button to combine all the separate shapes into one path on the shape layer.
Now that the paths are all one and the unfilled areas hanging out below are gone, it is easy to transform the frame. Create some lines on an upper layer to serve as perspective guide lines. Follow the angles of the 3D geometry. Use Distort and Skew to match the edges to the perspective lines. Then add some Bevel & Emboss and Inner Shadow layer styles to give it some dimension. A layer clipped to it is used for some quick scribbles to add hints of dirt and rust. The shape on the screen layer was filled a fence pattern, then scaled down and transformed to match the frame. A Color Overlay adjusted the color and a Stroke thickened it up a bit.

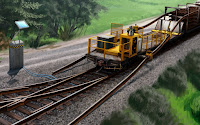
Now, it just needs some final details to finish it off. I didn't bother to build and render these in 3D because they are fairly simple. You can create them in Photoshop as vector objects on a shape layer. With layer styles, add a Gradient Overlay and Inner Shadow. In this case, the shadow is really going to be a soft highlight. Change the Blend Mode to Color Dodge and pick a light warm grey. Use a reflected gradient with the same light grey in Color Dodge to add the wide highlights on either side. Now there is a soft shadow going up and down the middle. The painting was added on an upper layer using this vector shape layer as a clipping mask. You won't need to paint much on this details layer; just indicate some dark smudges and streaks. I did this exhaust pipe and the canister behind it in the same way. This should do it; the train, rail, and tracks are done. In the next tutorial, I'll cover how to paint some people into the scene.


 Now it's time to finish this part up. We need to paint on the final details to make it look as realistic as we can. Rails tend to look rough and rusty, except on the top, which is polished smooth and shiny by the continual movement of the wheels over it, so it reflects the color of the sky. Make a new layer to do some quick, loose painting. The mask is the alpha channel of this geometry that was rendered from Cinema 4D. The next layer is for shadows. I painted those with PMS 296 on a layer in Multiply mode and used the same alpha channel for a mask. The next layer is for the pieces at the intersection, called a frog because they supposedly look like a frog (I don't really see it, either). Now the rails are looking done. The last details like the clips that hold them down can be added. As usual, the main shape was created as a solid color on its own layer, then the details were painted on a layer above it, then clipped to the bottom layer.

 Whenever possible, try to use vector shape layers to keep clean edges and maximize editability. For the framework around the screens, start with the Rectangle tool. Make sure the Shape Layers option is chosen at the upper left of the Options top bar. After making the rectangle, hold down the ALT/OPT key to subtract from the current shape and put holes in the rectangle, making it look like a frame with crossbars. Use the Path Selection tool (the black arrow) to select all the separate shapes on the one shape layer. Now you can copy and paste these shapes or just ALT/OPT+drag them to make a copy. Notice that with the Path Selection tool active and paths selected, some very helpful options become available. A number of Align and Distribute buttons can be used to make sure the shapes are evenly spaced out. Click the large Combine button to combine all the separate shapes into one path on the shape layer.

 Now, it just needs some final details to finish it off. I didn't bother to build and render these in 3D because they are fairly simple. You can create them in Photoshop as vector objects on a shape layer. With layer styles, add a Gradient Overlay and Inner Shadow. In this case, the shadow is really going to be a soft highlight. Change the Blend Mode to Color Dodge and pick a light warm grey. Use a reflected gradient with the same light grey in Color Dodge to add the wide highlights on either side. Now there is a soft shadow going up and down the middle. The painting was added on an upper layer using this vector shape layer as a clipping mask. You won't need to paint much on this details layer; just indicate some dark smudges and streaks. I did this exhaust pipe and the canister behind it in the same way. This should do it; the train, rail, and tracks are done. In the next tutorial, I'll cover how to paint some people into the scene.


No comments:
Post a Comment