Drawing and painting people accurately is one of the greatest challenges in art. This is one area where doing it digitally doesn't offer many shortcuts. But we can apply many of the principles used for other subject matter here as well.
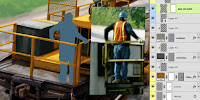
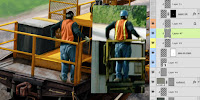
Unless you are an unbelievably talented artist, working from photos is crucial to drawing human figures and faces correctly. Here you can see the photographic source material for the guy on the train, scaled down to about the right size. Work on a new blank layer to paint a flat silhouette of the figure. Don't tell anyone, but you can put your photo in the exact spot you need it, then trace over it. Pick a midtone color that is related to any noticeable areas of large color in the photo. In this case, it's PMS 5405, a good choice as a base for denim. This layer will act as a clipping mask for the layers of detail painting. Add a layer mask to it, load a selection from the railing mask or alpha channel by CMD (Mac)/CTRL (PC)+clicking on its layer or channel thumbnail, and use it to paint black on the silhouette's layer mask where the rail covers up the guy. Since the other layers clipped to this one will use its layer mask, you won't need separate masks for each one.
Create new layers, clip them to the bottom layer with the flat silhouette, and get painting. I'll be using my favorite brush again, the 9-pixel thin pencil brush with the Opacity jitter set to Tablet. Size the brush up and down as needed by tapping the left and right bracket keys (just to the right of the P). You can pick colors directly from the photo if you want to. Hold down the ALT/OPT key while painting to turn your brush into the eyedropper temporarily. When picking colors from photos, it's a good idea to check your Sample Size. Select the eyedropper from the Tools panel and look at its options. Make sure the Sample Size is set to 3 by 3 average or higher. Because photos contain so many different colors, you may not want to pick a color from just one pixel. This option averages out that pixel with the pixels around it, so what you get is a more accurate representation of the blend of colors in that area. The more color noise in your photo, the higher this setting should be. Break your details up into layers. I used one for the hands and head, one for the pants and shirt, and one for the orange safety vest.
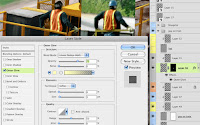
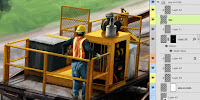 Paint the reflective stripes on a new layer not clipped with the rest because they need to be their own clipping mask. Add an Outer Glow to simulate the light this tape can reflect back. You can use the standard yellow color for the glow, but change the Blend Mode to Linear Dodge to make it really intense. This effect is a bit exaggerated, but it looks cool, and isn't that what it's all about? You may need to load a selection of the opacity of the main silhouette layer and use that as a mask on this layer so that the stripes don't stick out past the edges. Make a new layer and clip it to the stripes layer then add a few quick light and dark swatches to indicate the highlights and shadows on the folds of the tape. Now, the workman needs a hardhat, because you never know when something is going to fall on your head while you are on a train. The same approach was used for the hat. Put it on its own layer not clipped to the rest; that way, you can extend it past the edges of the head. Paint it as a solid color, then add the highlights and shadows on a new layer, using the bottom on as a clipping mask. That should do it. Just to keep things organized, put all these layers into their own group.
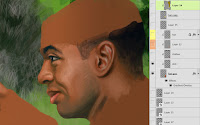
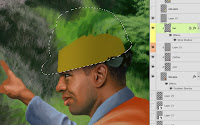
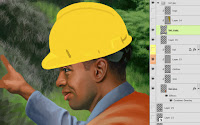 Now, it's time for the closeups. Since these are not really portraits, they don't need as much effort put into them. It's not a likeness, so there's no need to worry if it looks like your source photo or not; what's more important is correct anatomy. Start out with a flat base layer. For this guy, it's PMS 7516. All of the skin, face, and hair detail was painted on just one layer using the base layer as a clipping mask. I Did put a subtle dark to transparent gradient in Multiply mode as an effect on this layer to slightly darken the figure toward the back. All the upper layers clipped to this one will 'inherit' this same effect. If this had been a serious portrait, more time and effort would be required and several layers should have been used to allow for minute adjustments. Colors were picked directly from the photo. The shirt and vest were painted on separate layers also clipped to the base layer. Just like on the guy riding the train, paint the hardhat on a new layer not clipped along with the others. It will serve as a new clipping mask for the details above it. This is a yellow hardhat, so I used PMS 116 as the base.
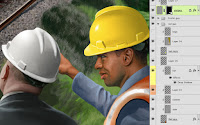 You can try another little Layer Styles trick for the shadow cast by the hardhat. Load the opacity of the base hardhat layer as a selection, make a new layer above the painted face, clip it along with the others to the 7516 base, and fill it with a dark yellow (the color doesn't really matter). Then, add a Drop Shadow effect along the bottom of this shape. Because this layer uses the base as a clipping mask, not only do you not see any of it that sticks out beyond the original silhouette, but you don't see any effects outside of it, either. This is easier than trying to paint in the drop shadow and it is adjustable. The reflective tape stripes were added on a layer above all these ones just like on the train workman. That about does it. The other guy was painted using the same techniques. If the job requires it, logos can be added (and then later removed as the client requests) on separate layers above the hardhats.


No comments:
Post a Comment