

This started out as a concept painting, but quickly evolved into a photo-realistic background image. Before I started out, I did a quick sketch from scratch in Photoshop to work out composition, lighting, color, mood, and so on. Dylan Cole, a great matte painter working professionally right now, starts out with a painting, even if the final will be done using photos. Here is my painted study for this image.
I made some changes in the final, but this gave me a good idea of what I was shooting for. I made a new document at 1920x1080 pixels. This is HD resolution and I would normally work at twice that size if HD was my final goal, but since this was really just concept art, working at a smaller size seemed okay. The first thing I needed was a starry sky for the background. There are some good tutorials out there on how to make a star field using the Add Noise filter on various layers, or you can pull some good images from NASA and similar websites. I did that just to save some time.

These stars looked a bit too bright, so lower the layer's Opacity to 60%. Then to add some denser clusters, create a new layer, fill it with black, and add Gaussian Noise with Monochromatic unchecked. This is to give some color to the stars, but it is a bit too much, so perform a Hue/Saturation adjustment to the layer and lower its Saturation down quite a bit. Normally, I would use an adjustment layer to make non-destructive edits, but this is a situation that requires the direct approach. The end result should look about like this.

 Change the layer's Blend mode to Screen and lower the Opacity to 40%. Now the black drops away and the stars on the layer beneath will show through. To add a random, cloudlike pattern, make a layer mask for this layer and add a black-to-white linear gradient at a bit of a horizontal angle. Then run a Difference Clouds filter on the mask. You should see something like this. The wavy black line running through the clouds texture is created by the interaction of this filter with the gradient ramp. Now, invert the mask so that you get a negative of this image. Do a Layers adjustment and pull the black and midtone sliders to the right so that you get more black in the image. The white areas of the mask will reveal the noise texture on this layer and the black will conceal it. Just so you know, this technique is great for bolts of lightning and electricity.
As a final touch, add a new layer and fill it with a light blue, clip it to the noise layer, and change its Blend mode to Color. Lower the Opacity to that it looks good. The idea here is to add a bit of blue tint to the background stars. Adjust all of these layers to get just the effect you want. Here is what I ended up with.

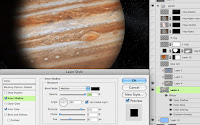 Now for Jupiter. The best thing to do is find a nice, high-res astronomical photo of the planet. Again, NASA or other image banks are a good source. Scale and rotate the image as needed and remove it from its background with the Elliptical Marquee. This is a nice photo of Jupiter, but it looks a bit flat. To take it to the next level and heighten the drama, use some Layer Styles. The effect we are looking for here is Jupiter as a light source in the night sky, reflecting light from the sun, but we also want to see the shadow's edge along the planet. The Layer Style includes an orange-to-transparent radial Gradient Overlay in Multiply mode to give the planet some roundness, a Color Overlay of rust in Overlay at 40%, an Inner Glow of dark grey in Multiply to curve the edges away a bit, and an Inner Shadow. Use these settings for a realistic shadow. Quite the difference, no?

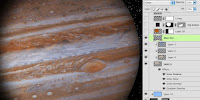 To further darken the edges, create some new layers and clip them to the bottom Jupiter layer. Add some linear gradients using a medium greyish-blue-to-transparent linear gradient from top to bottom and right to left. Use darkening Blend modes on these layers like Color Burn or Multiply and adjust the Opacity as needed. To punch up the white bands across the planet a bit, make a new layer and change its Blend mode to Color. Paint some light blue over the white bands where you would like to bring some white and grey back. Don't clip it along with the other layers or the Color Overlay will override this one as well. Jupiter looks about done at this point, so in the next tutorial, we will finish it off and add the final details.

 Now for Jupiter. The best thing to do is find a nice, high-res astronomical photo of the planet. Again, NASA or other image banks are a good source. Scale and rotate the image as needed and remove it from its background with the Elliptical Marquee. This is a nice photo of Jupiter, but it looks a bit flat. To take it to the next level and heighten the drama, use some Layer Styles. The effect we are looking for here is Jupiter as a light source in the night sky, reflecting light from the sun, but we also want to see the shadow's edge along the planet. The Layer Style includes an orange-to-transparent radial Gradient Overlay in Multiply mode to give the planet some roundness, a Color Overlay of rust in Overlay at 40%, an Inner Glow of dark grey in Multiply to curve the edges away a bit, and an Inner Shadow. Use these settings for a realistic shadow. Quite the difference, no?
 To further darken the edges, create some new layers and clip them to the bottom Jupiter layer. Add some linear gradients using a medium greyish-blue-to-transparent linear gradient from top to bottom and right to left. Use darkening Blend modes on these layers like Color Burn or Multiply and adjust the Opacity as needed. To punch up the white bands across the planet a bit, make a new layer and change its Blend mode to Color. Paint some light blue over the white bands where you would like to bring some white and grey back. Don't clip it along with the other layers or the Color Overlay will override this one as well. Jupiter looks about done at this point, so in the next tutorial, we will finish it off and add the final details.


No comments:
Post a Comment