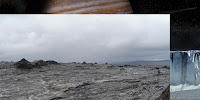
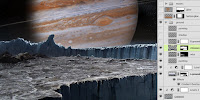
What this image is lacking now is a foreground. The idea is to create an icy expanse to suggest the frozen surface of the moon. I chose this photo of a barren, bleak landscape. It doesn't look too frosty right now, but we will take care of that later. You may notice one big problem: the ground photo isn't large enough to stretch all the way across my new image. Since I really liked this photo, I decided to make a ragged selection with the Polygonal Lasso tool, then copy and paste that area to a new layer. I moved it to the right edge of the image and used the original selection to mask out that same are on the original ground photo and just like that, instant crevasse! It's a bit of a cheat, but it works. Use the same channel techniques shown in the last entry to create a mask to drop out the sky. Finally, put a dark blue-to-transparent Gradient Overlay in Multiply mode to darken the left side of the ground. Now Europa's surface is really coming together.
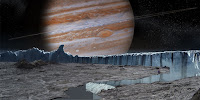
Obviously, the gap has to be filled, so use another ice wall photo for the side of the crevasse. Put a dark Gradient Overlay on the left side, similar to the one on the ground, to darken the interior of the crevasse and suggest more light entering in from the right side where it opens up. The final step is to paint in the missing details and extend the ground. In my case, I also have to cover up the hiker from the original photo. To pull things together, paint a bit of a highlight edge along the tops of the rocks that stick up. Remember that the light is coming from behind, so we need a backlit look. Use a small brush to paint in these details. As usual, I used one of my favorites: Photoshop's own Pencil - Thin brush.
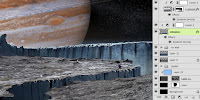
To make the near edge of the crevasse stand out a bit more, add a dark linear gradient over it on a new layer in Multiply mode to darken it even more. Put a reflected gradient going horizontally over the far edge of the ground to soften it and blend it up into the ice wall. Keep its layer in Multiply mode, but reduce the Opacity to 50%.
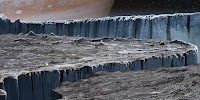
The ground is almost done, but the right edge of the crevasse needs a bit of hand painting to finish off the edge and add any necessary details. Also, the rocks that are sticking up from the ground should probably cast a bit of shadow. Paint the shadows on a new layer in Multiply mode, using a dark color. Try a brush with a softer edge for this. Reduce the Opacity as needed, and the foreground is finished.


 What this image is lacking now is a foreground. The idea is to create an icy expanse to suggest the frozen surface of the moon. I chose this photo of a barren, bleak landscape. It doesn't look too frosty right now, but we will take care of that later. You may notice one big problem: the ground photo isn't large enough to stretch all the way across my new image. Since I really liked this photo, I decided to make a ragged selection with the Polygonal Lasso tool, then copy and paste that area to a new layer. I moved it to the right edge of the image and used the original selection to mask out that same are on the original ground photo and just like that, instant crevasse! It's a bit of a cheat, but it works. Use the same channel techniques shown in the last entry to create a mask to drop out the sky. Finally, put a dark blue-to-transparent Gradient Overlay in Multiply mode to darken the left side of the ground. Now Europa's surface is really coming together.
 Obviously, the gap has to be filled, so use another ice wall photo for the side of the crevasse. Put a dark Gradient Overlay on the left side, similar to the one on the ground, to darken the interior of the crevasse and suggest more light entering in from the right side where it opens up. The final step is to paint in the missing details and extend the ground. In my case, I also have to cover up the hiker from the original photo. To pull things together, paint a bit of a highlight edge along the tops of the rocks that stick up. Remember that the light is coming from behind, so we need a backlit look. Use a small brush to paint in these details. As usual, I used one of my favorites: Photoshop's own Pencil - Thin brush.


No comments:
Post a Comment