Since this was to be used as a Christmas card, I created the image at 8.25"x5.5" at 300 ppi. Of course, you can use whatever size and resolution you want. The place to start is the sky. If you have been following along with previous tutorials of mine, you know that I create skies with separate gradients. Each one is a foreground-to-transparent Linear gradient on its own layer. The benefit to this is that you can easily change each color, or its Opacity and Blend mode. The PMS color I used is on each layer's label. For the final Radial gradient, use Color Dodge to increase the feeling of luminosity. This is to suggest the sun, which has just set in this region of the sky.
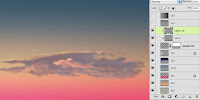
Paint the clouds on a separate layer using a simple brush and PMS 437. Add a black Linear gradient on a layer mask to fade away the bottom of the clouds as they approach the horizon. When I originally created this image, I had to use Fade to lighten the gradient, but now you can use the Masks panel to lower the mask's Density for the same effect. For the cloud details and highlights, paint on new layers that use the main clouds layer as a Clipping Mask. The painting should be a bit loose and free; you just need to suggest these other colors.
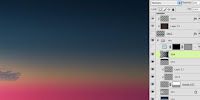
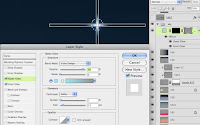
This is supposed to be a night scene, so we need some dark areas. On new layers in Multiply mode, add some gradients using 539 to transparent. Adjust the Opacity as needed. This is a great way to get in all the subtle gradients of the sky at dusk that you just can't get by making a custom gradient with many colors. For the star, use the Line tool to make two intersecting lines on a vector Shape layer. Add a layer mask and use a white-to-black Radial gradient on the mask to fade away the star's edges. Add Inner and Outer glows to complete the effect. The Inner Glow should be set to Center so that the center of the star is the brightest. Make sure Layer Mask Hides Effect is checked. For convenience sake, you can group all these layers into one folder to keep your file organized. In the next tutorial, we will start on painting the ground.


 Paint the clouds on a separate layer using a simple brush and PMS 437. Add a black Linear gradient on a layer mask to fade away the bottom of the clouds as they approach the horizon. When I originally created this image, I had to use Fade to lighten the gradient, but now you can use the Masks panel to lower the mask's Density for the same effect. For the cloud details and highlights, paint on new layers that use the main clouds layer as a Clipping Mask. The painting should be a bit loose and free; you just need to suggest these other colors.
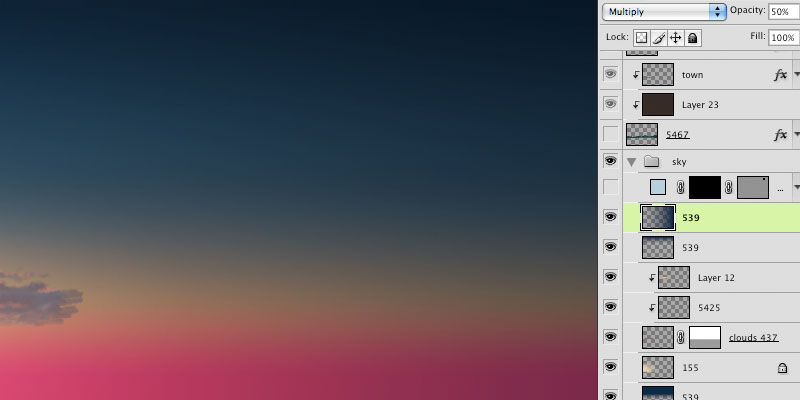
 This is supposed to be a night scene, so we need some dark areas. On new layers in Multiply mode, add some gradients using 539 to transparent. Adjust the Opacity as needed. This is a great way to get in all the subtle gradients of the sky at dusk that you just can't get by making a custom gradient with many colors. For the star, use the Line tool to make two intersecting lines on a vector Shape layer. Add a layer mask and use a white-to-black Radial gradient on the mask to fade away the star's edges. Add Inner and Outer glows to complete the effect. The Inner Glow should be set to Center so that the center of the star is the brightest. Make sure Layer Mask Hides Effect is checked. For convenience sake, you can group all these layers into one folder to keep your file organized. In the next tutorial, we will start on painting the ground.


Much to learn from this tutorial. Thanks for posting it.
ReplyDeleteThanks for looking.
ReplyDeletethis is a great lesson.thanks for sharing your knowledge!
ReplyDeleteclipping path service
I came to this blog and it helped me to add few new points to my knowledge. Actually, I am trying to learn new thing wherever I find. Impressive written blog and valuable information shared here.ตัดต่อภาพ
ReplyDeleteThanks for sharing your info and landscape image. I truly appreciate your efforts and I will be waiting for your next post thank you once again.
ReplyDeletevisit here: Clipping path service.
yurtdışı kargo
ReplyDeleteresimli magnet
instagram takipçi satın al
yurtdışı kargo
sms onay
dijital kartvizit
dijital kartvizit
https://nobetci-eczane.org/
ZHYURF
شركة تنظيف شقق بالقطيف 3H3EjdRF4W
ReplyDelete